Images - Our visual cortex can process visual information faster than the rest of the brain is able to process words. And so, with no surprise, this makes images key to attracting attention and providing information quickly.
In a world where audiences expect information instantly, users are making impressions fast, and they’re using images as vital pieces of information to make assumptions about your company identity and to create a sense of what your business and content is about. Audiences are drawn to visual information, and so rightly, we go about filling our websites with an array of images to get noticed, communicate, inform and entice.
But, while we’re busy creating an engaging visual experience for visitors to our sites, images are also busy affecting elements of those sites’ technical performance and influencing SEO. As images can both influence the audience and impact SEO, it is important to balance providing an excellent visual experience with making sure images have the best possible performance for ranking factors. That is why making sure your web images are optimised is crucial.
How Effective Optimisation Gives The Best Of Both Worlds
We optimise images because they provide value to our websites in different ways, and from differing perspectives – but, with this there is an element of conflict in attaining the best value from an image on a site. One image attribute might be valuable from a user perspective, but, at the same time, that same attribute could have a negative effect on performance:
To the user:
- Images are an audience pleaser; they’re attractive and are a source of instant information.
- Higher quality images, look and are received, better.
- Multiple images can be great.
For website performance:
- All the images take up space – High quality images are larger and therefore take longer to load.
- Page load speed is a ranking factor: With the average patience for load time being only 3 seconds before abandoning, users love fast loading sites, and Google too is, self-professed, ‘obsessed about speed'. Loading speed has become so significant that the speed that a page loads, can affect your position in SERPs (Search Engine Results Pages).
- Images are valuable content, but:
- Search engines don’t see what you see (or do they?*) – Search engines read and display your images in image searches using associated data and page content; like file name, page title and ALT text to match with search terms.
- Higher quality images typically have a larger file size and take longer to load – Which can negatively affect both user experience and SEO.
- Many images on a page means that there is more data to load which can reduce page speed – again negatively affecting both user experience and SEO.
According to HTTP Archive (for 2019) images account for nearly a third of the bytes loaded on our websites, making them the second largest resource after video. This means that images are having significant impact on how fast our web pages load and so have huge potential, when managed correctly, to speed up page load times.
According to HTTP Archive (for 2019) images account for nearly a third of the bytes loaded on our websites, making them the second largest resource after video. This means that images are having significant impact on how fast our pages load and so have huge potential, when managed correctly, to speed up page load times.
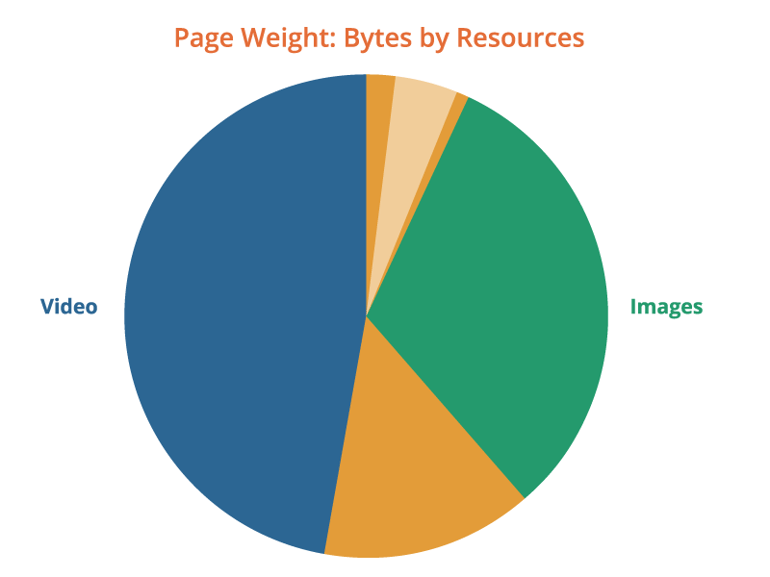
Reducing the space taken up by images increases page load speed, which influences SEO and can in turn boost conversions; all the while enhancing user experience and engagement. The balance to strike is in reducing the size of image files without compromising image quality so that we still provide excellent visual experience but that those images are served quickly.
So, optimise images should be optimised to attain ‘the optimum’ median between performance factors and a valuable visual experience.
It’s all about balance.
*Or do they see what you see? Google also uses computer vision algorithms alongside ALT text and the page content to understand the context of an image – We had a play with their Cloud Vision API to see just what this means….
From a series of tests using the same image subject matter: ‘rock climbing’ – Google is clearly able to identify subjects in an image:
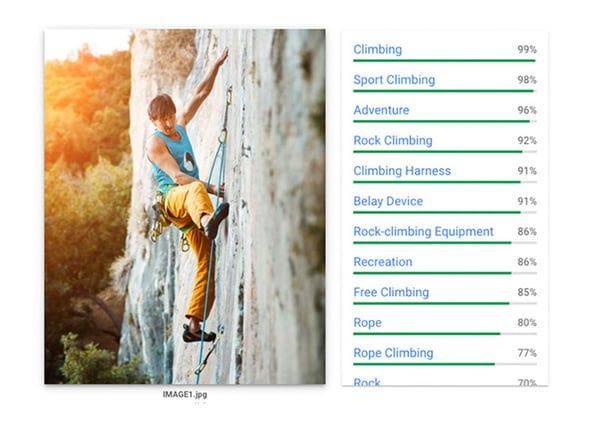
Note: all metadata was removed from images and images were all titled with a non-descriptive ‘IMAGE-000’ format – so the only thing that Google had to go on was the subject matter of the image – impressive stuff!
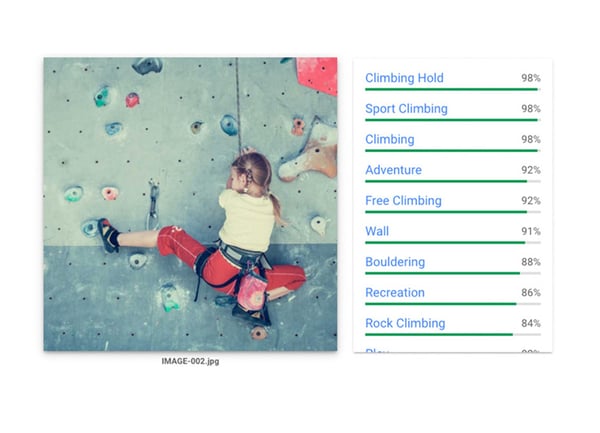
Perhaps ‘rock + person’ is quite easily identifiable as ‘rock climbing’; we threw in some more ‘obscure’ images to see how well it performed… Again, google was quite often hitting the ballpark, but not always…
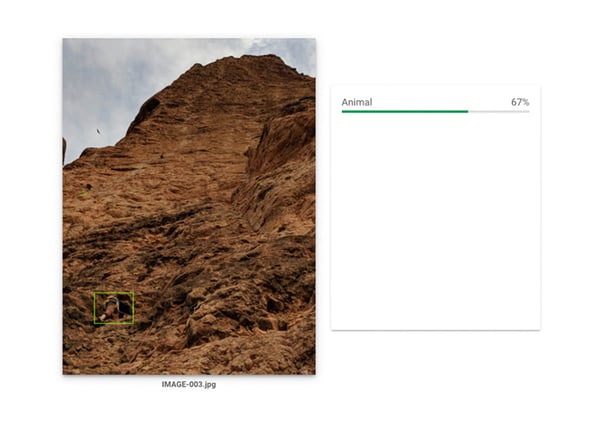
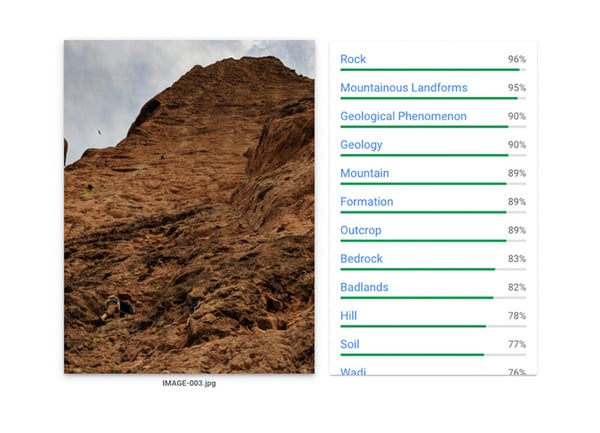
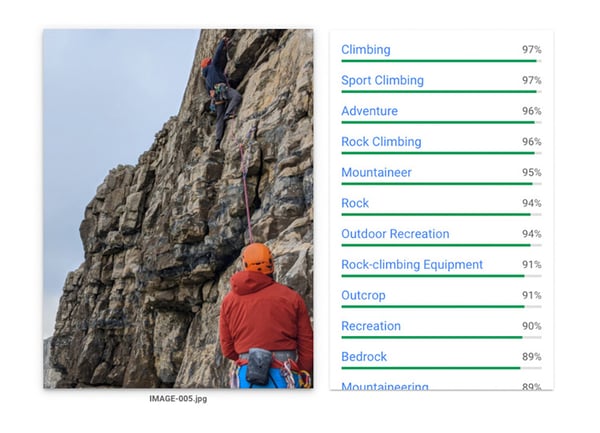
But - this set of images also highlighted that there is something that Google is consistently missing out on using machine learning alone… context. For example, there are multiple disciplines in rock climbing, two of which are ‘bouldering’ (low-level climbing with no ropes) and ‘sport climbing’ (using ropes) – Google couldn’t discern between the two. Google also didn’t manage to identify the person holding the rope at the bottom as rock climbing, or the climber standing at the top of the climb as rock climbing. So, Google’s computer vision algorithms are impressive, but are still missing key detail that is important to our users. This reinforces the importance of ensuring that when we display images on our sites, we need to provide the context!
What is Image Optimisation?
Image optimisation is balancing image quality and display size with minimum file size – achieving an effective middle ground for a pleasing visual experience and SEO performance: getting the most efficient value out of images on your site.
How to Optimise Images for Your Website
Here’s a helpful guide on best practices for producing optimised images for your website, quickly optimising an existing photo or image for web, and how to batch optimise images for SEO, without losing quality!
You can use these same principals if you’re optimising images for Instagram or other social media channels and it’s the same process if you want to know how to optimise images for mobile.
Producing Optimised Images
A guide to best practices for creating optimised images and graphics for your website:
Step 1: Determine the Display Size Dimensions Needed.
Firstly, what’s your intended purpose for your image? For example, where on your website is your image going to go? Is it going to be a ‘hero’ banner or header image? A featured image or thumbnail? An image within the content of a page or blog? Is your image going to appear in multiple places?
The intended use of your image will dictate the dimensions of the image that you are creating.
Remember: your aim is to create an image that balances the smallest possible file size, with display quality.
Larger image dimensions tend to mean larger file size – So, what you are trying to do is work out how small can you go and what are the largest dimensions at which your image needs to appear on your website? This is so that you can avoid putting up any images that are larger than they need to b and the browser having to load the full-sized image, taking longer to load, even if it is displayed on the page at a smaller size.
At the same time, and particularly with graphical elements, if you create an image that is the correct pixel dimensions for where it needs to be, your image will display with greater clarity.
How do I find out the correct pixel dimensions to use?
Think about your largest displays and screen sizes first – and work down from there.
If you are adding an image to somewhere that has a set frame or width, for example for a ‘hero’ header banner, using the exact pixels needed will allow you to optimise best.
You may have your web image dimensions on file, or you can find these details by speaking to your developer. If you know where you’re looking, dimensions might be indicated in your website back end, or by inspecting the page element from the front.
If you want to place an image within an editable content section on your site, where you can choose how large to display your image within the width of the section, you should produce your image to the size that you would like it to appear. A useful image optimiser here can be a pixel measuring add-on to your browser, for example PixelZoomer for Google Chrome: This allows you to measure elements/space on your website and help you to decide what dimensions to use.
If your image will be appearing in multiple places, particularly if you only have one instance where the image file needs to be larger, it may be worth producing another (or multiple) versions of that image so that you can use different sized versions where needed. This means that web pages can load the minimum image data (loading faster, pleasing users and benefiting SEO), and gives you an opportunity to crop appropriately to display images at different aspect ratios if needed.
Step 2: Set Up the Correct Image File Size
So, you’ve decided what dimensions your image needs to be: The maximum size it will ever need to display at or the exact pixels for the job.
The next step is to set up a new artboard/document in your image editor at the pixel dimensions that you need; making sure it has the appropriate presets for web (make sure you are using RGB colour mode and 72 dpi (screen resolution) as this is how images are displayed on your site).
There are a whole host of image editing software options available (free and subscription), from the industry favoured Adobe Photoshop to online tools such as Adobe Spark or Canva. Lots of these have useful resizing features so that you can easily resize images and artwork should you need to.
Step 3: Complete Your Creation
Drop in your photo(s), add text and shapes: complete your design/make any edits to your photo.
Great! Remember that computers don’t see what you see though. And not all users can access image content. Text embedded in images can be great for user experience, but this text may not be accessible to all users and is not adding value for SEO. If you can, or where possible, it is always best to place any text, especially important text, within the body of the page instead of in images. If your image needs text, try to make sure key information also appears in your text content and be careful not to use images for displaying text in place of in your text copy. With the right know-how, you or your developer can use CSS to overlay images with text and achieve your desired results whilst also having your copy readable as text.
Text heavy images
When it comes to image SEO, Google says it’s all about user experience: “To boost your content's visibility in Google Images, focus on the user by providing a great user experience: make pages primarily for users, not for search engines.” This means one thing: relevance. It means using relevant images to a page, optimising the placement of the image by locating them wherever possible next to relevant text, avoiding embedding text in images as this is not accessible to all users (and page translation tools can’t read images). It’s worth noting that providing high quality page content is just as important as visual content for image search ranking.
Step 4: Save Your Image
This simple step has some key influence:
Choosing The Right File Format
There are three familiar image formats used for web, JPEG images, PNG images, and GIF files. JPEG and PNG are the most commonly used and are supported by all web browsers. These image file types compress images differently, meaning that you see differences in the image aesthetics and the file size.
For example:
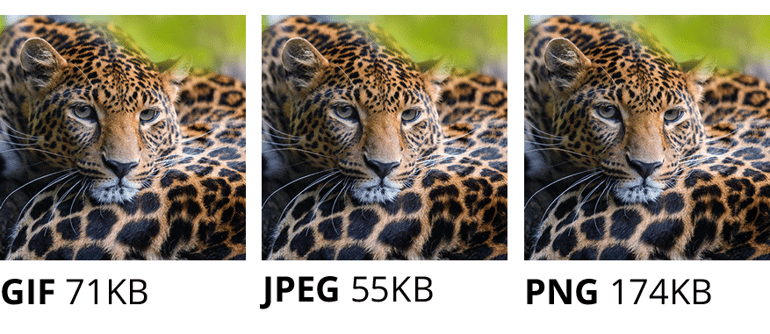
In this instance, JPEG is the easy choice! It produces the smallest file size without loss of quality.
However, JPEG is not invariably the best choice. The difficulty in choosing the correct file format is that the optimum can change with properties of the image. Therefore, it is usually best to experiment and find the result you are most happy with. Having said that, there is a general rule of thumb that can be applied: JPEG tends to produce better results for photographs, while PNG produces more optimum results for graphics.
Note: The ‘Save for web’ function in Adobe Photoshop allows you to preview and compare the results of saving as different file formats.
You should also consider using a vector graphic for logos or other appropriate graphic elements. SVGs (Scalable Vector Graphics) are the commonly used vector format and are scalable for perfect clarity at any display size. They are also supported by all web browsers.
Note when using SVGs: if using SVGs you will need to further optimise them by minifying & compressing the file.
Give It an Effective Image File Name
Remember: search engines don’t see what you see! (and what they do see is missing out on perspective – you need to provide the context)
‘WhatsApp Image 2019-06-18 at 17.37.26.jpeg’ doesn’t tell search engines much about the image, or anything about what the page is about…
This is your opportunity to optimise your image file name, before you upload it to your site. Here’s a few best practice hints and tips:
- Describe the contents of the image
- Use keywords/phrases that relate to the page content where the image will be and that are relevant to your business/business goals to… Describe the contents of the image
- Be careful not to be ‘spammy’ (keyword stuffing) while you… Describe the contents of the image: Avoid writing a filename that is a long list of many and assorted keywords, and don’t use too many characters - as an absolute maximum keep it under 100.
- Within 3, include your brand name where appropriate.
- Try not to use elements of your internal image filing system as part of an optimised image’s file name: keep image names distinct. Avoid internal abbreviations and numbering e.g. ‘music-festival-headline-MFEST18-0042.jpeg’ (‘MFEST18-0042’ might be useful for your filing, but there is no value here if it is not relevant to users or if these terms won’t be being searched for). To help with internal filing, instead organise your optimised images in descriptive folders.
- Use hyphens-to-denote-separate-words ‘childrensbookshowauthorsigning.png’ is not the right way to go…
- Try not to use unnecessary additional words: ‘This-is-a-photograph-of-a-tabby-cat-that-is-drinking-fresh-milk.jpg’ would be better optimised as ‘tabby-cat-drinking-fresh-milk.jpeg’
Help: Best practice principles in writing good Alt text can help you with naming your images.
Save It Again(?) and Decrease Your File Size
You could explore decreasing your file size further by additionally compressing your image. Whether you want to do this may depend on the results of saving your image initially or the method/software that you used to save your image in the first instance.
Compare these two images:
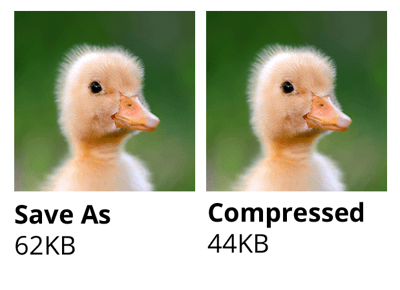
With no discernible difference in quality the compressed image is 30% smaller!
If the method that you used to save your image initially has already sufficiently decreased your file size, the benefits of further compression may be minimal. For example, if you have used Adobe Photoshop’s ‘Save for web’ feature in the first instance:
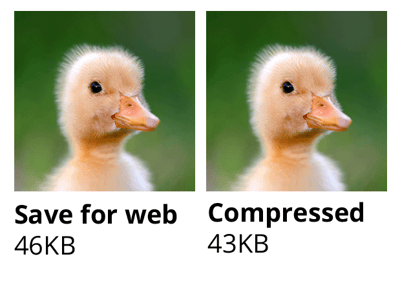
The reduction in file size is smaller (only 7%).
Just remember: any reductions in size that you can achieve can accumulate to speeding up page loading!
Help: There are an array of compression tools available, with Imageoptim (recommended by Google) and Shortpixel among the best performing.
Note on retina displays: You should also try to remember retina displays when compressing images. You could optimise specifically for retina displays (increasing file size and load speed for what is likely a small margin of users), but If you avoid compressing images too severely (around 40%), then the image you produce for standard displays should scale up amply for a retina display.
Step 5: Finish the Job – Add Alt Tags
You’re ready to upload your image, congratulations! But, it’s not quite finished when you upload your optimised image to your site. There are still ways to make sure that your image can perform even better:
Make sure you add Alt text – this is a must.
Remember: Alt tags are key to the value of your images for SEO. Find out why image Alt text is important for SEO and more on how best to write them.
Every image should have Alt text, and this is not just for SEO reasons but because the alt text is what can be made audible to make images accessible to people with visual impairments.
You should also think about your image placement, captions and titles. Relevance is key.
Google says: “Google extracts information about the subject matter of the image from the content of the page, including captions and image titles. Wherever possible, make sure images are placed near relevant text and on pages that are relevant to the image subject matter.”
Quickly Optimise Photos for Web
If you have an existing photograph that you quickly want to optimise for your website, and you don’t need to fit it to a specific aspect ratio, you can use various image web resizer and image optimisation tools or the ‘Save for web’ function available in Adobe Photoshop.
Here’s How to Quickly Optimise an Image in Adobe Photoshop
Open your photograph or image in Adobe Photoshop, then navigate to File > Export > save for web (Command+Shift+Option+S). This is where you experiment with the settings to find the optimum compression for your image.
On the right-hand side of the window, try experimenting with file format and quality options (top-right) and image size options (bottom right)
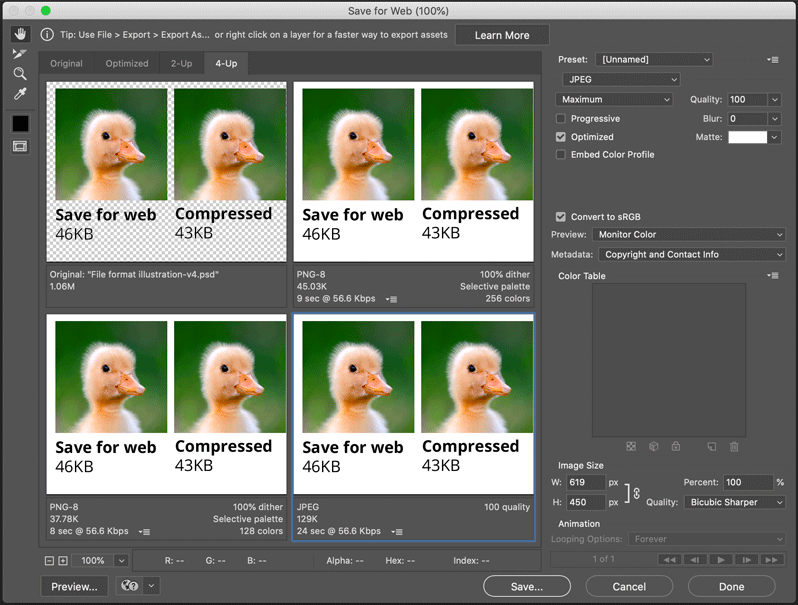
You can select the ‘4-Up’ tab in the top left-hand tabs to view 4 versions of your image to help you see which provides the best outcome for your image. You can also preview these to size in your browser to better assess quality by clicking ‘Preview’.
When you have decided on the best solution to balance quality and file size, make sure this option is selected and then hit ‘Save…’.
Here’s the important thing – you still have to make sure you are completing steps 4 and 5 above! And remember that speed of the task comes with familiarity.
Keep optimising!
Batch Optimising Images for Web
It’s also possible to compress on batch for a set of images, it’s just that little bit trickier to manage the settings and there is less flexibility for finding the best option. You can do this in Adobe Photoshop, but there are other options out there.
Here’s How to Batch Optimise Images with Adobe Photoshop
- Create a folder containing all of the images that you need to optimise for web (and if you would like to save the optimised images somewhere else, a folder to contain those too).
Note: If you don’t want to save your images in a different location, Photoshop will automatically create a new folder in the original location to save the optimised images. - Open up Adobe Photoshop, then navigate to File > Scripts > Image Processor

- In the window that opens, under ‘Select the images to process’, use ‘Select Folder’ to choose your folder (created in step 1) containing the images to compress.
- If you have created a folder to save your optimised images in a different location, under ‘Select location to save processed images’, use ‘Select Folder’ to change the destination.
- ‘File Type’
- Under ‘File Type’ select ‘Save as JPEG’
- Set the ‘Quality’ to your desired value
- Tick ‘Convert profile to sRGB’
- You can also use ‘Resize to Fit’ to set the maximum width and height for your images
Note: In this batch process you have less flexibility than processing images individually (you must use JPEG) and you have no opportunity to preview your results so it might be best to process a test run of fewer images first to check you are happy with the results. - Click ‘Run’ to process your images.
Here’s the important thing – you still have to make sure you are completing steps 4 and 5 in ‘Producing Optimised Images’ above! With this option you have to use JPEG, but make sure to rename your images appropriately and consider decreasing image file sizes further using a compression tool like Imageoptim (recommended by Google) or Shortpixel.
Note: Without Photoshop, you can use SmartResize to batch resize your images and then a compression tool like Imageoptim to decrease file size. Remember to appropriately rename your images and complete step 5 in ‘Producing Optimised Images’ above!
Tricks of the Trade: Automating Optimisation and Further Ways to Boost Performance and Display Great Images
As with ‘everything digital marketing’, technologies are ever advancing, goal posts are being adapted and new tools become available to be added to your arsenal. For image SEO, there is a world of tricks and advanced ways of helping your images to perform better to explore. There are ways to serve responsive images, apply automation, implement lazy loading (deferring offscreen images and significantly speeding up loading on long pages), utilise schema mark-up to enrich your Alt text, the list goes on. You can also include images in sitemaps, utilise advanced file formats and compression methods, and there is always more to learn tomorrow…
And Finally…
One of our team aims is to ‘learn something new every day’ to keep our expertise fresh and to help us keep producing the best strategies and results for the clients we partner with. We hope this article has give you something new to learn today.
You can discover more of the knowledge we share in our ‘Knowledge Hub’ or perhaps you’d prefer to get in touch via our website or call us on +44 (0) 333 772 0509 about your aims and visions to find out how we can help you achieve your digital marketing goals.


