How to Setup GTM on Your Website

Step One – Define your goals
Understanding what you want to achieve with your tracking is key to successfully implementing GTM on your site. Before you get carried away with implementing a whole array of tags, custom JavaScript variables, or my personal favourite, lookup tables. You need to know what you want to learn and what that will do for your business.
GTM tracking allows you to collect a whole heap of data in the form of events into Google Analytics. However, historically, most business want to understand similar metrics. So, what is it business want to see in Google Analytics? Here is a brief list of some of the most common events we’ve created GTM tracking for in the past.
- Form Submissions
- Contact Link Clicks (split by phone and email)
- Document Downloads
- Outbound Link Clicks (where people leave the site)
- Video Engagement
- Scroll Depth
- Engagement Timer(s)
- Copying Text
- Live Chat Engagement
- CTA Clicks
Each site is unique and setup in a different way so while the implementation will be broadly the same, there will be differences site to site. This means for each site or for each tracking project, the tags you deploy will have to be customised to meet your needs.
Each of the tracking options outlined above is likely to be interesting to understand and view in Google Analytics. However, not all are goals. This is where there needs to be an important distinction between micro-goals and fully fledged, meaty goals. A micro-goal would be something like “CTA Clicks” or “Video Engagement”. These are goals that indicate someone is engaged on the site and more likely to become, say a prospect. However, none of these are a goal.
A goal should be something that adds business value. The most common goal is a purchase (on an e-commerce site). However, in the case of the tracking options above, the most important goal would be “Form Submissions”, the B2B site equivalent of an online purchase. A form submission will likely provide a lead to the business which can then turn to customer which in turn leads to value added. Someone clicking on a CTA button does not provide value added to the business at that point. Instead this metric might tell us how well the site is performing from an engagement perspective, or how attractive/effective the CTA is. It might tell us what’s important to a visitor (by which CTAs they click), it might also tell us what pages are performing the best and what CTAs need improvement. But it’s not a goal.
Once you’ve got a clear understanding of what a goal looks like to your business, you can then start to progress with the setup of your tracking and your GTM container.
It’s important to note that different businesses will have different goals and how you split your goals is likely to differ as well. Often businesses will have multiple goals for multiple key forms or events. How granular your goals need to be is another decision you’ll need to make and your agreed KPIs could well help with that.
Step Two – Do you have access?
GTM and Google Analytics have very specific access requirements. If you’re taking over a container which has already been setup or starting from scratch, you need to make sure you have the right access.
In GTM (Google Tag Manager) you'll need publishing access. This allows you to push any changes you’ve made on the account live. This level of access also gives you the ability to do things like preview changes (live on your site) and much more, which can be extremely helpful when testing (we'll come back to this).
In Google Analytics you need admin access at account level. Google Analytics has three levels of access. Account, property and view. Account level access allows you to apply things like filters so it’s important to have it. However, to setup GTM and link it to Analytics you’ll just need admin access at the property level. Although this isn’t ideal, it’s enough to get things up and running.
Not only do you need fairly high-level access to both these platforms you’ll also need access to edit the HTML code of the website in question. When installing GTM onto your website you’ll need to amend the theme’s code or install a plugin (whichever is easier). We’ll get back to the best way to install your GTM snippet on the site a little further down.
Step Three – Setting up your GMT account and container
A container is where you keep all your tracking and code for a single website or domain. Your GTM account allows you to have multiple containers in order to help businesses which might work on multiple domains or sites. It is possible to have multiple domains in one container with the use of cross-domain tracking; however, this is a slightly complex process that don't need to explore here.
Setting up your account/container is a fairly straightforward process. Go to Google Tag Manager and click create account. You then need to fill in some basic details such as your company name and country. Once you’ve done this, you’ll be prompted to setup your container.
Here you’ll need to enter your domain and the platform you intend to use GTM on. In this case (and most others) you should select “web”.
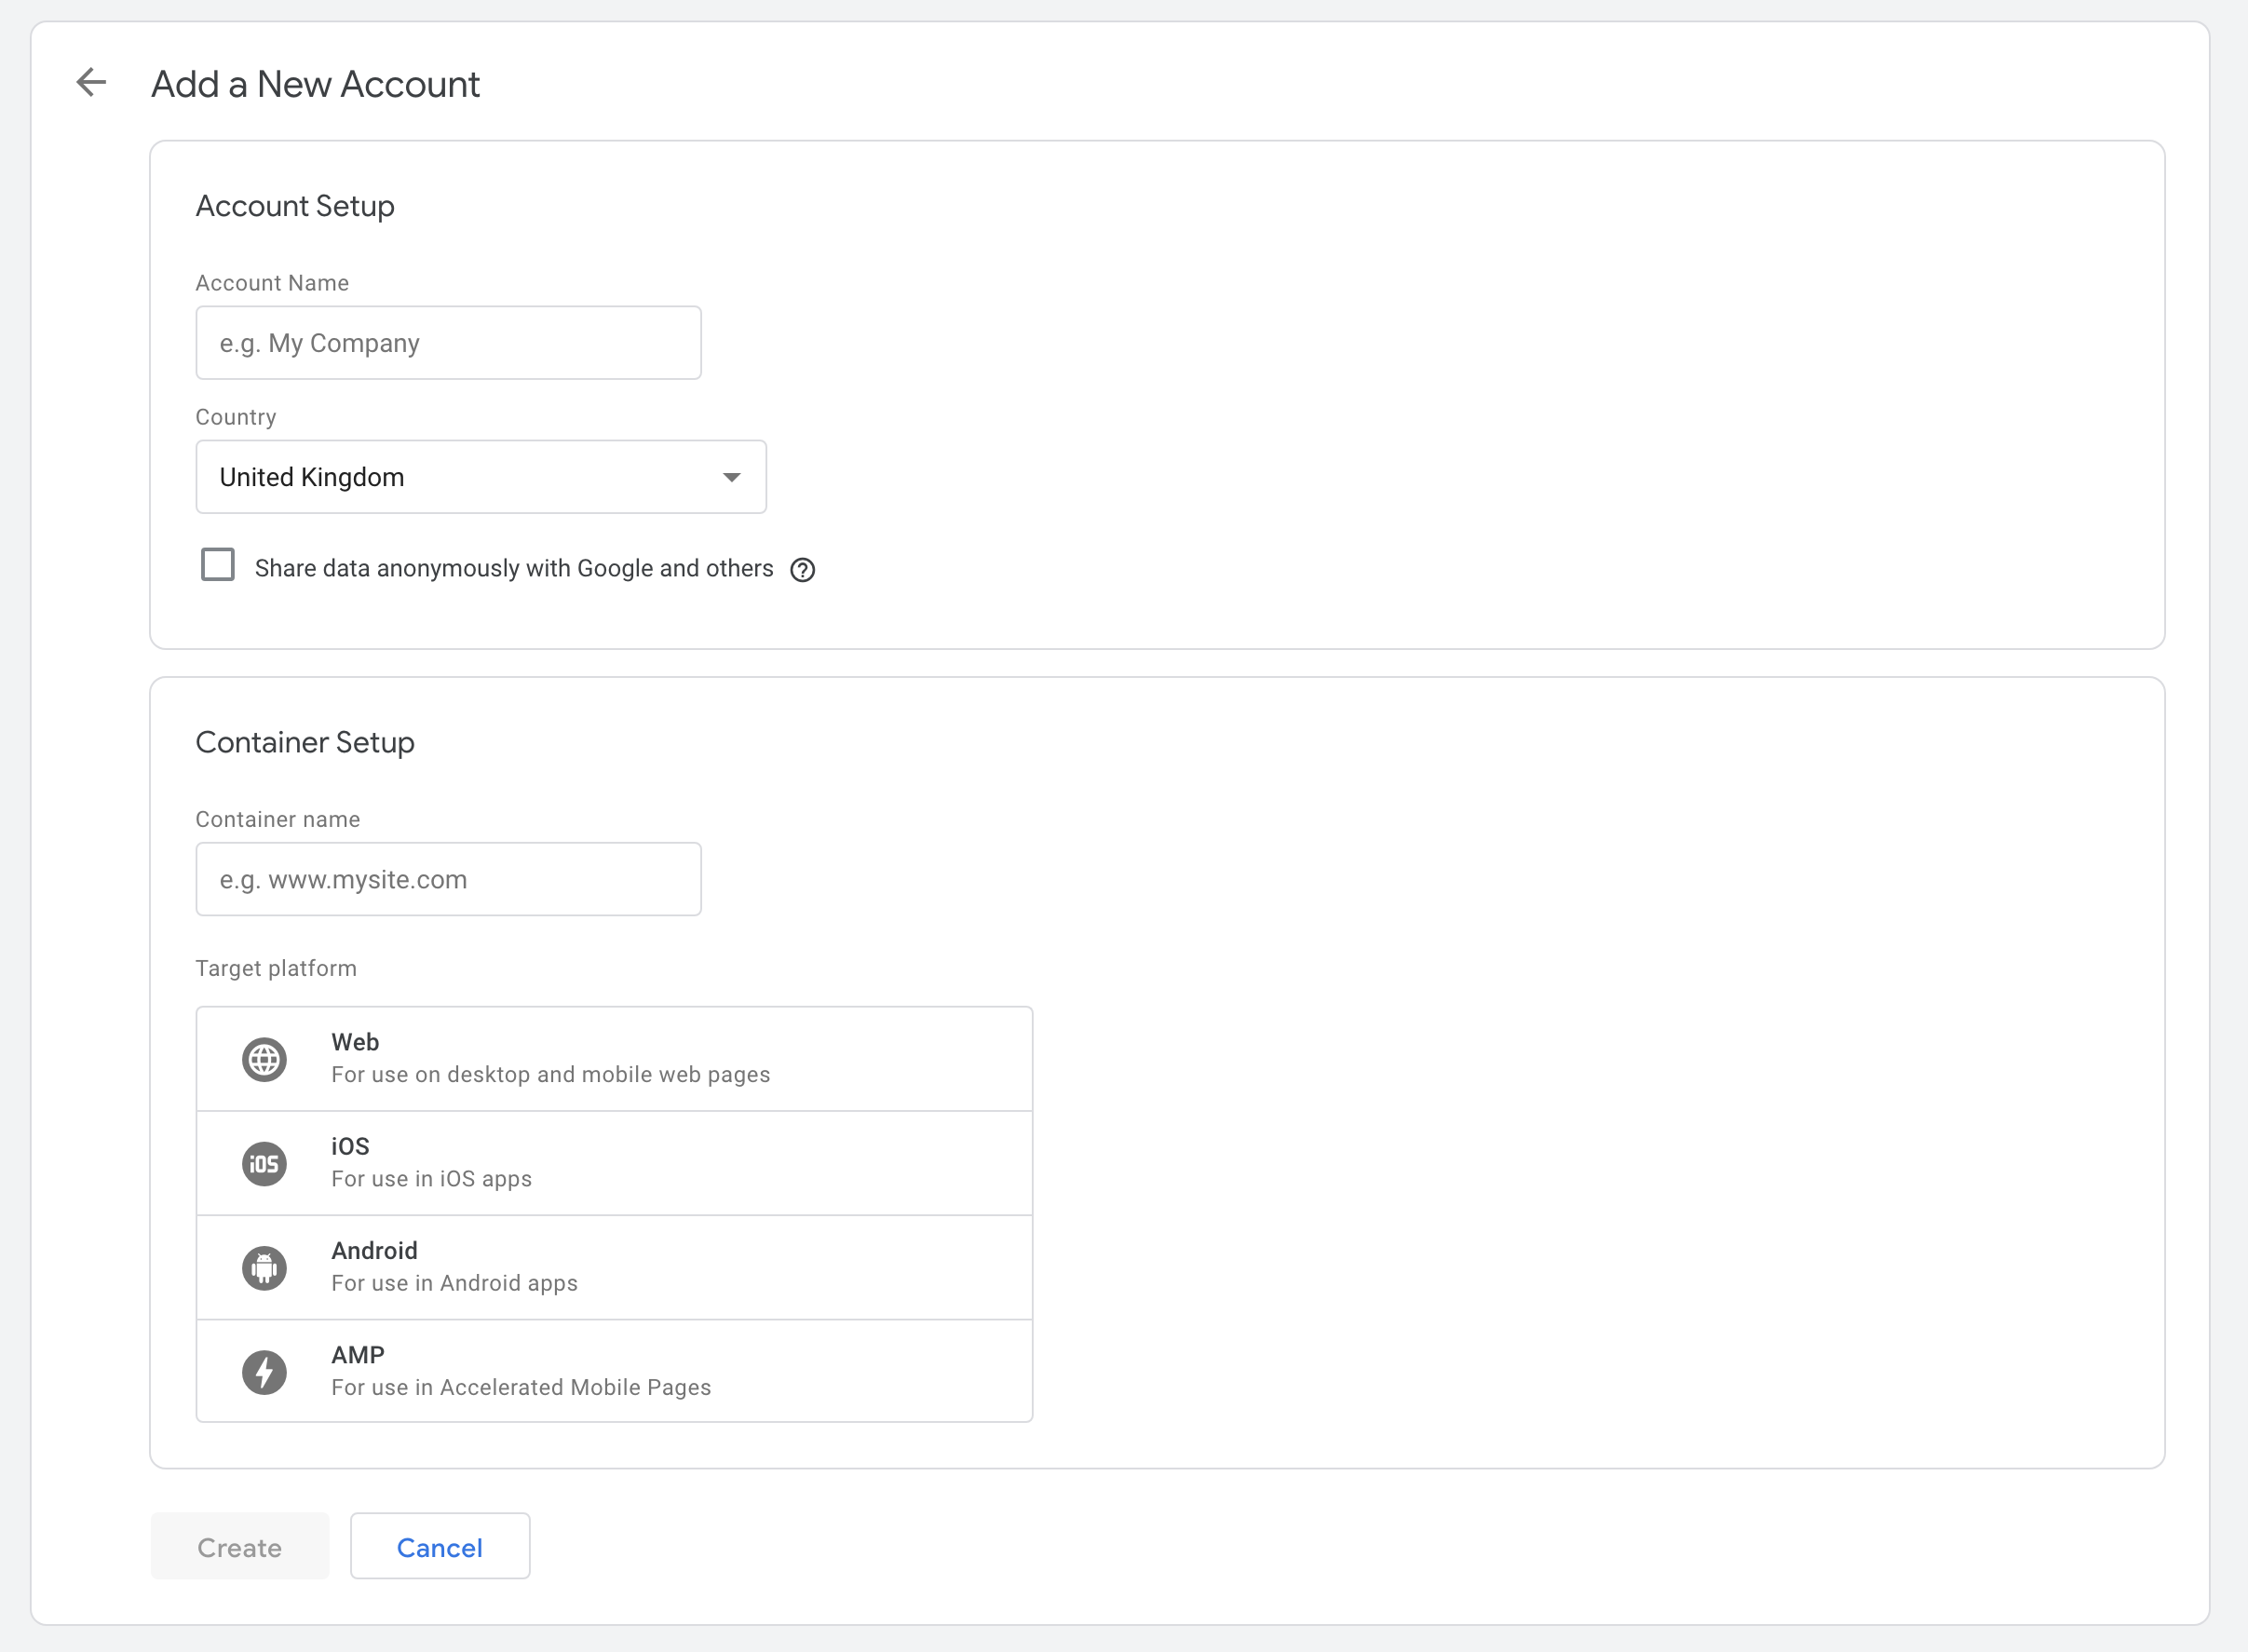
And that’s it, you’ve setup your GTM account and container.
Step Four – Installing GTM on your site
When installing GTM on your site the most important thing to remember is that it needs to be on all pages of your site. This is essential for proper tracking, especially if you’re implementing the standard Google Analytics tracking through GTM (which you probably should). Otherwise you could stop tracking visitors on certain pages of the site and lose visibility. You can segment any pages you want or don’t want GTM to fire on within GTM, so there’s no need to limit it at this stage.
To find your GTM snippet, navigate to GTM > Admin > Install Google Tag Manager. From here you can copy the code snippets for both the <head> section of the page and the <body> section of the page. We’d recommend you save a copy of this code in an HTML document for quick and easy access later on.
How you install GTM depends on your CMS. As a lot of sites are on WordPress, we'll use that as an example. Many sites hosted on platforms like HubSpot, Squarespace and Shopify often have a custom HTML area in their settings which allow for the implementation of this kind of code snippet fairly easily. However, for others such as Drupal you’ll need to install a custom module (which might require a developer to help).
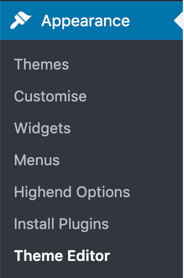
For most businesses/websites on WordPress there are two ways to install GTM. The first is by adding the code directly to the theme header. The second is through installing a plugin - there are plenty out there so you’ve got a lot to choose from and ratings should give you an indication of which ones work best.
Theme Header Implementation:
To hard code GTM into your WordPress site you’ll need to navigate to Appearance > Theme Editor > Header. From here you can copy the code into the right section. The <head> code should be as high up on the page as possible. You should also be able to implement the <body> tag in this same section of WordPress. This <body> snippet again needs to be as high up as possible “immediately after the opening”.
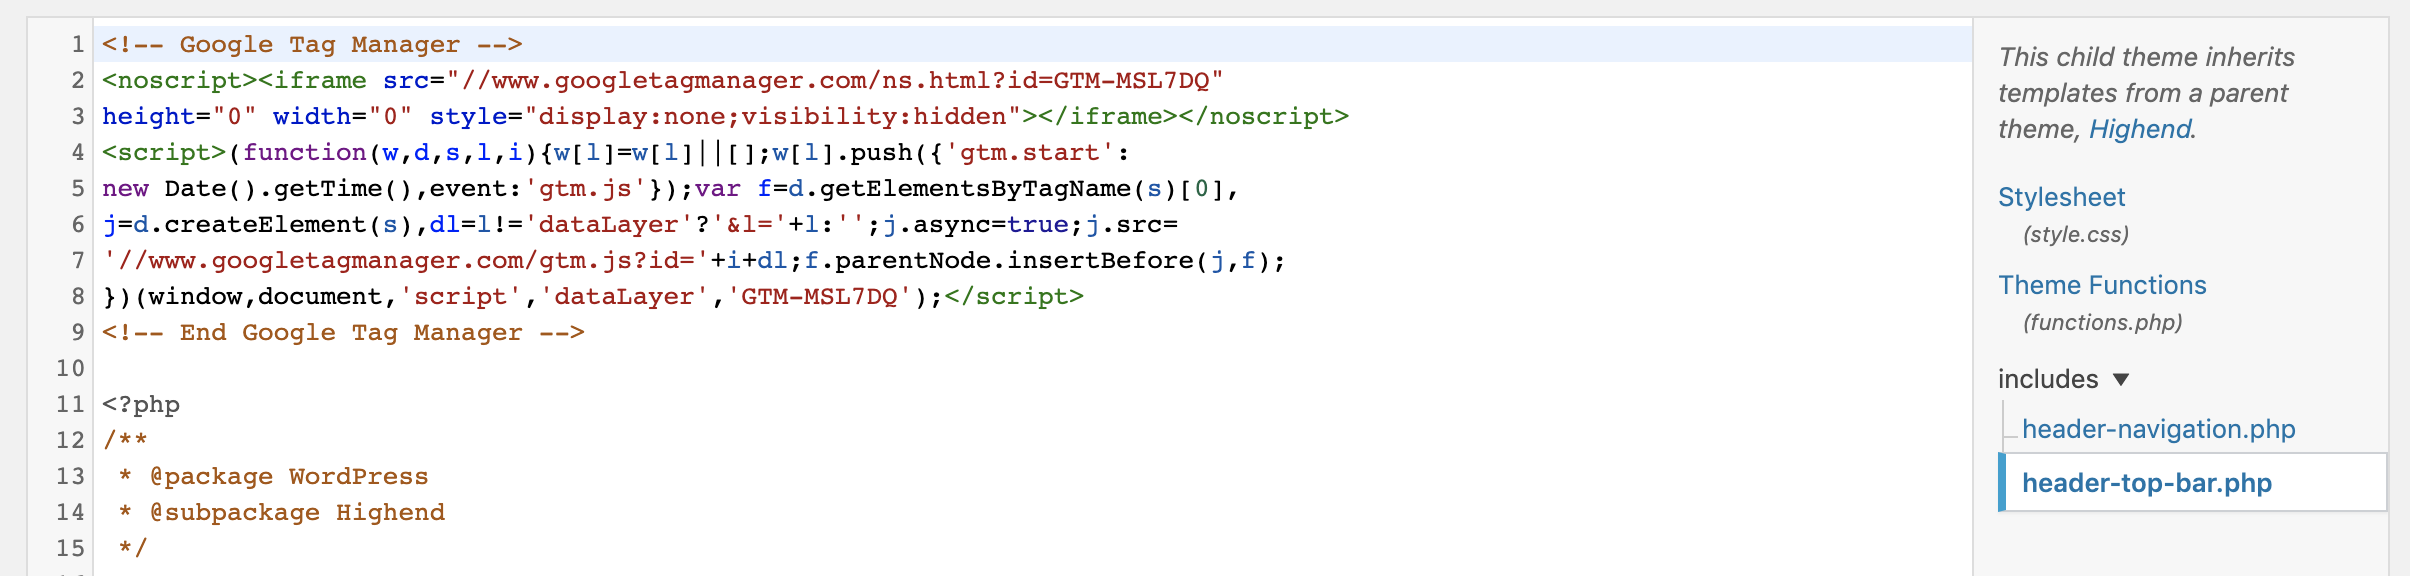
Plugin Implementation:
If you would prefer not to play with your site's HTML code, then there are hundreds of plugins for installing GTM and other code snippets in the header and footer/body of a Wordpress website. However, we’ve found the following three plugins to be the most useful.
We currently use “header and footer scripts” the most. This is because it has an additional feature that adds additional code to the header and footer of individual pages. This can be particularly useful when implementing additional scripts which can’t be added through GTM. Scripts like the Google Optimise Anti-Flicker snippet.
Once you’ve installed one of these plugins (you only need one), you can then copy the GTM snippet code you accessed earlier and implement it on your site.
It should look something like this:
To test your GTM code has been added to the site correctly and working as it should, we would recommend you do the following.
Check the GTM code snippet is appearing in the source code of your site pages. We would recommend you check a number of pages to ensure it working on all pages of your site. To view source code, you can right click on the relevant page of your website and select “view page source”. Or you can navigate to View > Developer > View Source. You can then search for the code snippet by searching on the page (command + f) for “gtm”.
You should then be able to locate the GTM snippet. If it’s not there something has gone awry. The first thing to check would be the changes you implemented have been saved. Alternatively, a simple refresh of the page might do the trick.

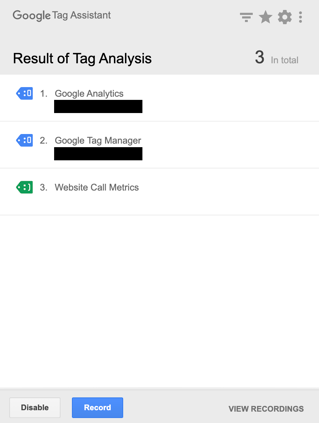
You can additionally use the Google Tag Assistant plugin for Chrome to locate if GTM has been installed correctly. Please note if you haven’t published anything to the container you may see an error pop up.
Now it’s time for the hard bit, time to add the tracking.
Step Five – Basic GA Tracking Setup
When starting GTM tracking for the first time, the first thing to setup is your generic Google Analytics Page View tag. If you have previously run Google Analytics tracking directly on the site, this pageview tag simply replaces the piece of code you would otherwise hardcode on the site.
We find implementing this through GTM helps to keep all your tracking in one place and the amount of code directly on your site to a minimum.
The setup of this tag is very easy and should only take a few minutes. It’s important to note if you’re already running Google Analytics tracking on your site you should get GTM ready to go before you remove it from your current site, as you could end up with a period of no traffic being tracked on your site (affecting the validity of your data). Equally, you don’t want to have two GA code snippets, one directly on the site and one in GTM, as this could lead to errors with reporting and double counting users.
If you’re not already aware it’s important to go over the structure and vocabulary of GTM. In short there are three different kinds of GTM functions.
- Tags – these are where GTM packages the data you’re going to send to Google Analytics (or whatever platform your using) and where you’ll manage the majority of the code/tracking you add to the site. There are many different kinds of tags (not just for tracking or analytics purposes). GTM can be used for any kind of code you want to add to the site. Whether it’s adding a cookie handler, external plugins from platforms like Hotjar and more. However, for the purpose of adding additional tracking to the site we only care about the “Custom HTML” and “Google Analytics: Universal Analytics” formats.
- Triggers – these are what cause a tag to be fired. If someone fills out a form on your site we’d want the trigger to be when someone clicks on the submit button or when an AJAX event confirms an email has been sent. One of the most important (built-in triggers) is “All Pages”. This allows the tag to fire on all pages, you might use this for a chatbot, the Google Analytics Page View tag as well as many others.
- Variables – these capture data from the page. This could be the page url, text on the page, specific form names, video duration or click text to name a few. This is where you will pull through a lot of the insights you’ll later see in Google Analytics. There are a large quantity of built in variables that GTM can automatically detect, but as you become more advanced you’ll be able to capture others too.
Setting up your first tag: Add images on site
You can follow the steps below to quickly setup your first GTM tag. We’re going to be implementing the standard Google Analytics Pageview tag.
Firstly, select “New”. Then select the correct tag type by clicking in the tag configuration box. From here select Google Analytics: Universal Analytics.
Make sure the track type box is set to “Pageview”
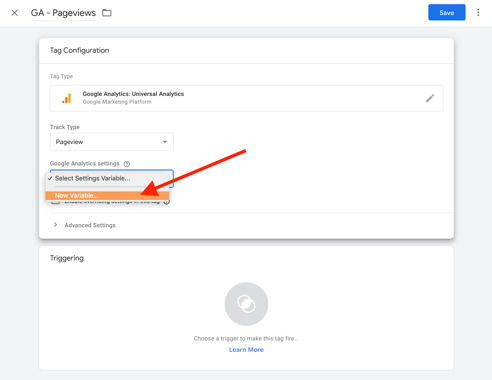
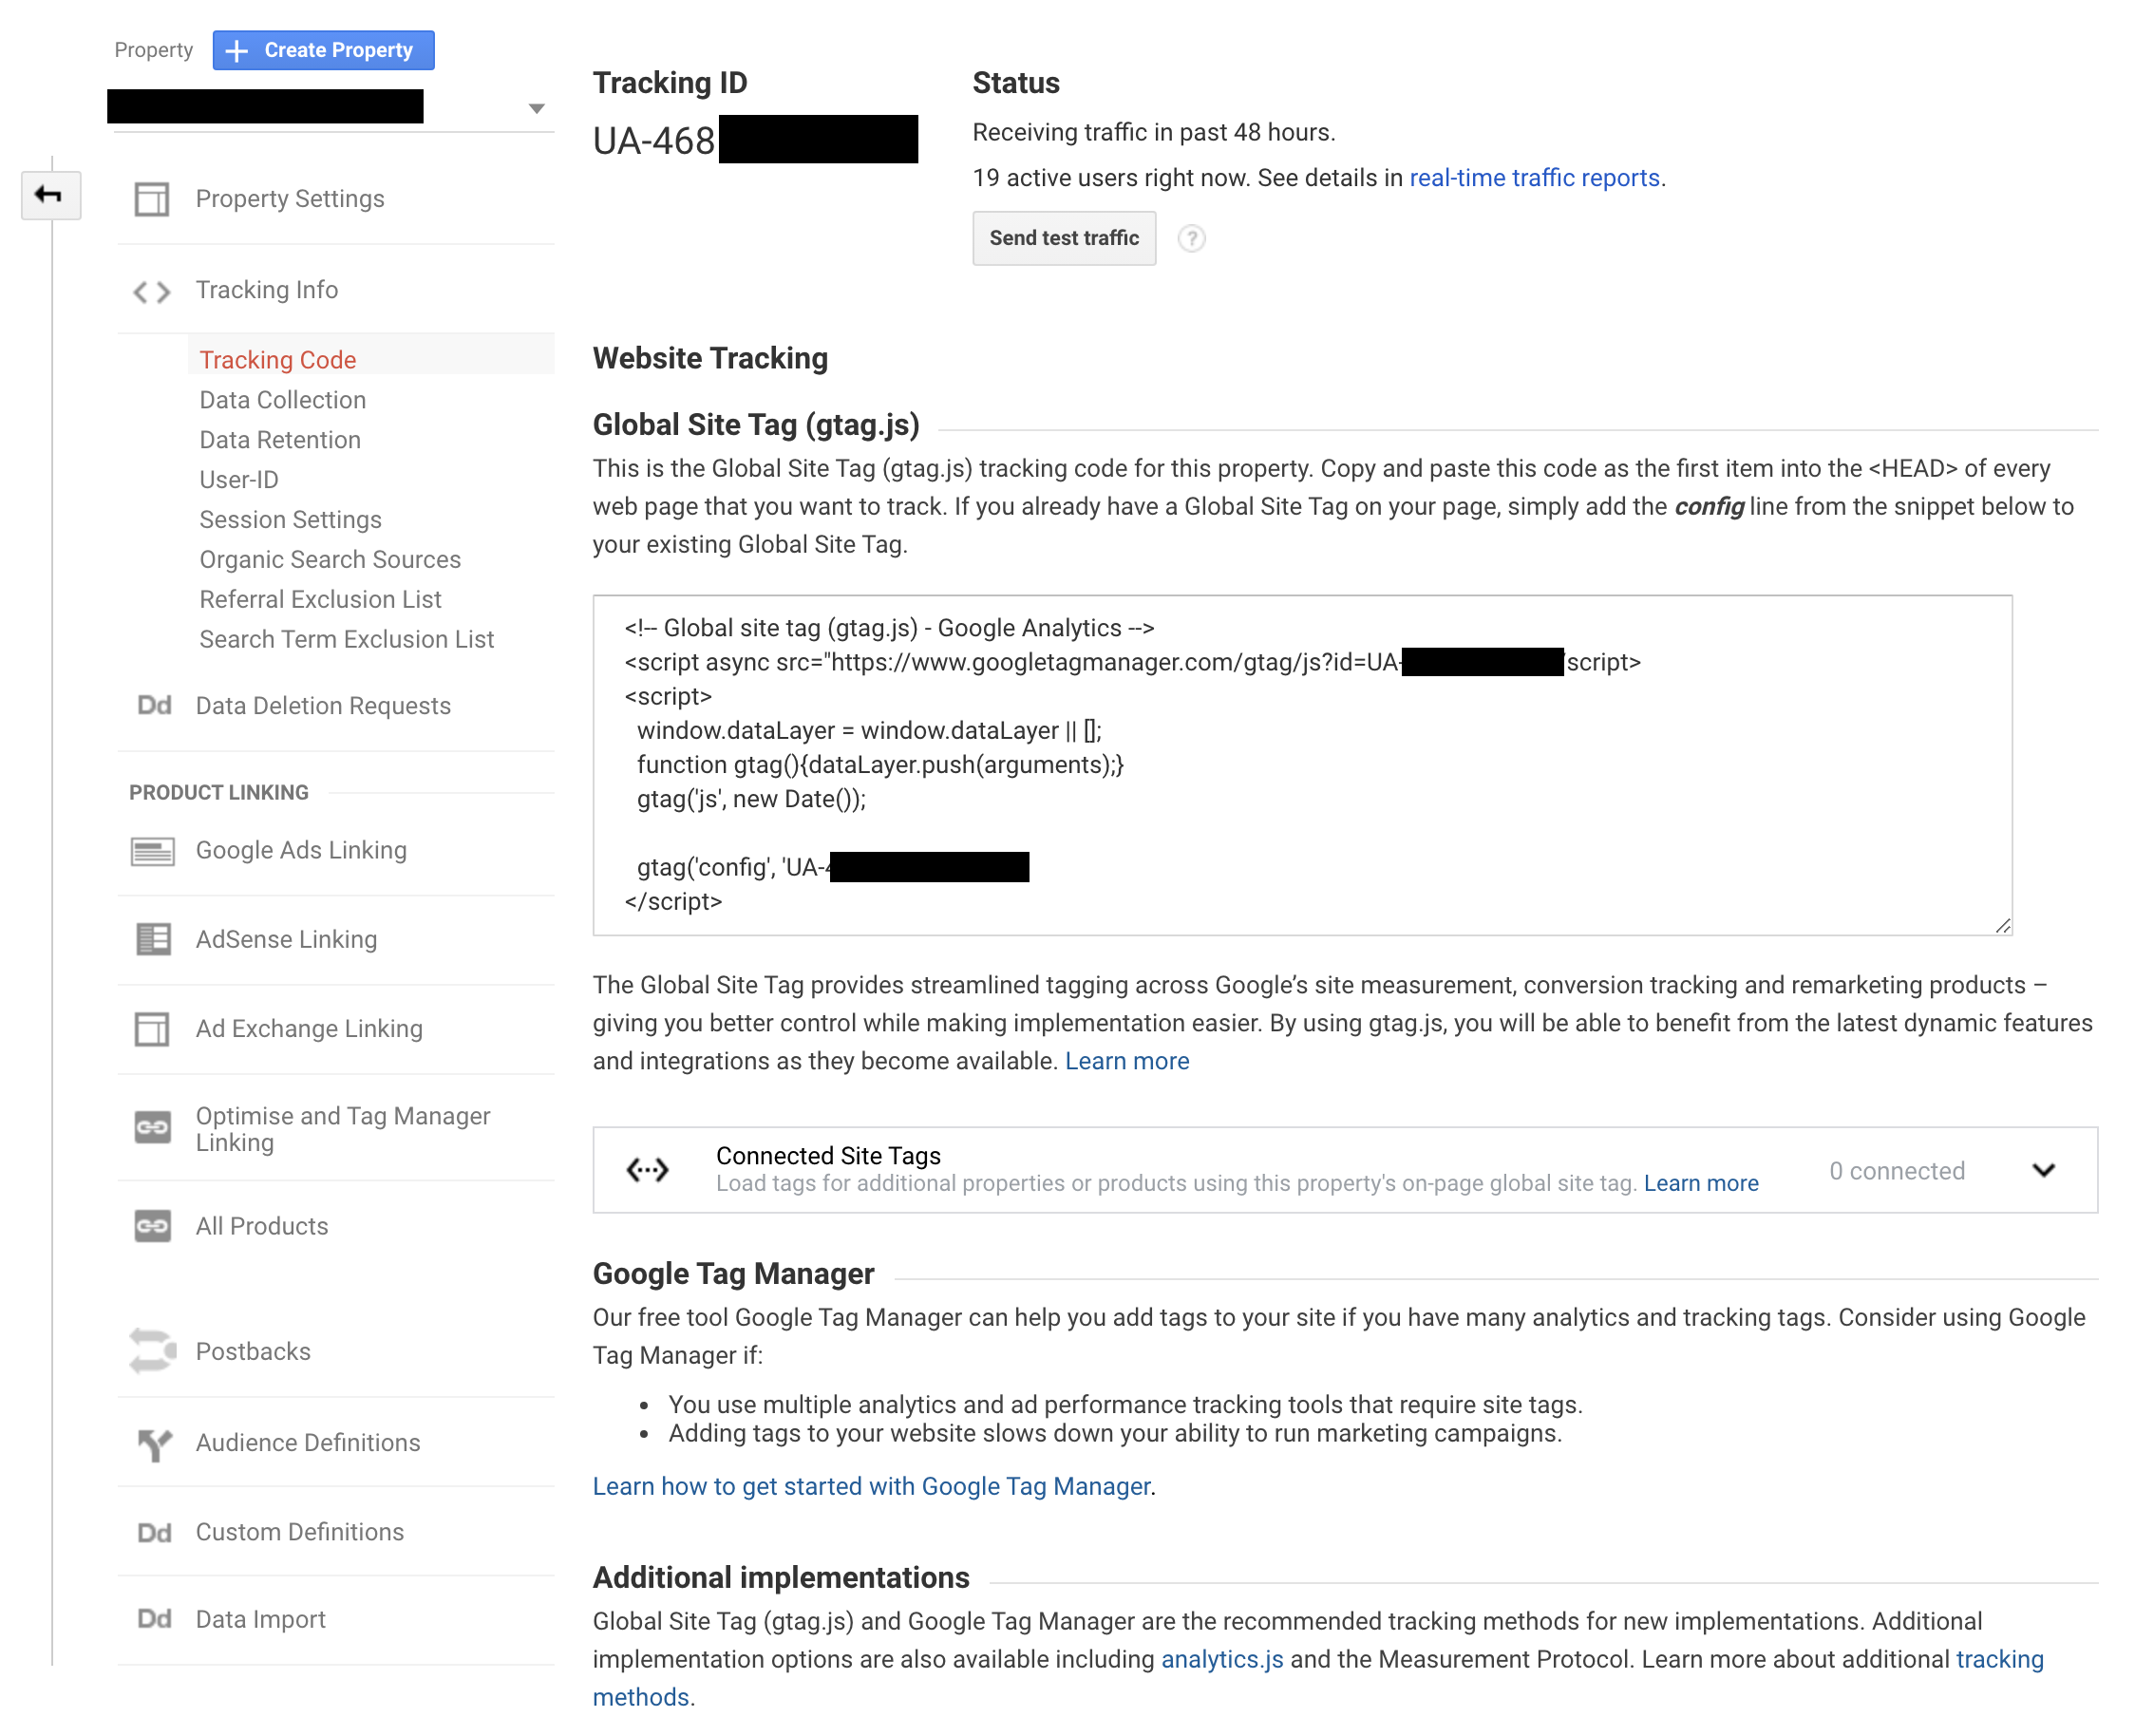
You’ll need to create your first variable now. This will be your GA (Google Analytics) ID. You can find this in the admin section of your Google Analytics property. You’ll need to navigate to Admin (cog button) > Property > Tracking Info > Tracking Code. On this page you’ll see your “Tracking ID” in the top left corner of the page. It’ll start with “UA-“… If you’ve ever hardcoded your Google Analytics tracking code to your site, this page will be familiar to you.
Copy the tracking ID and paste it in the “Google Analytics settings” variable. You don’t need to change anything else on this variable. GTM understands its purpose. Once you save you should be directed back to your Pageview tag.

Next up is the trigger. GTM has a number built in but you’ll likely only see the one at this stage. The one you should see will be called “All Pages”. Select this in the triggering box.
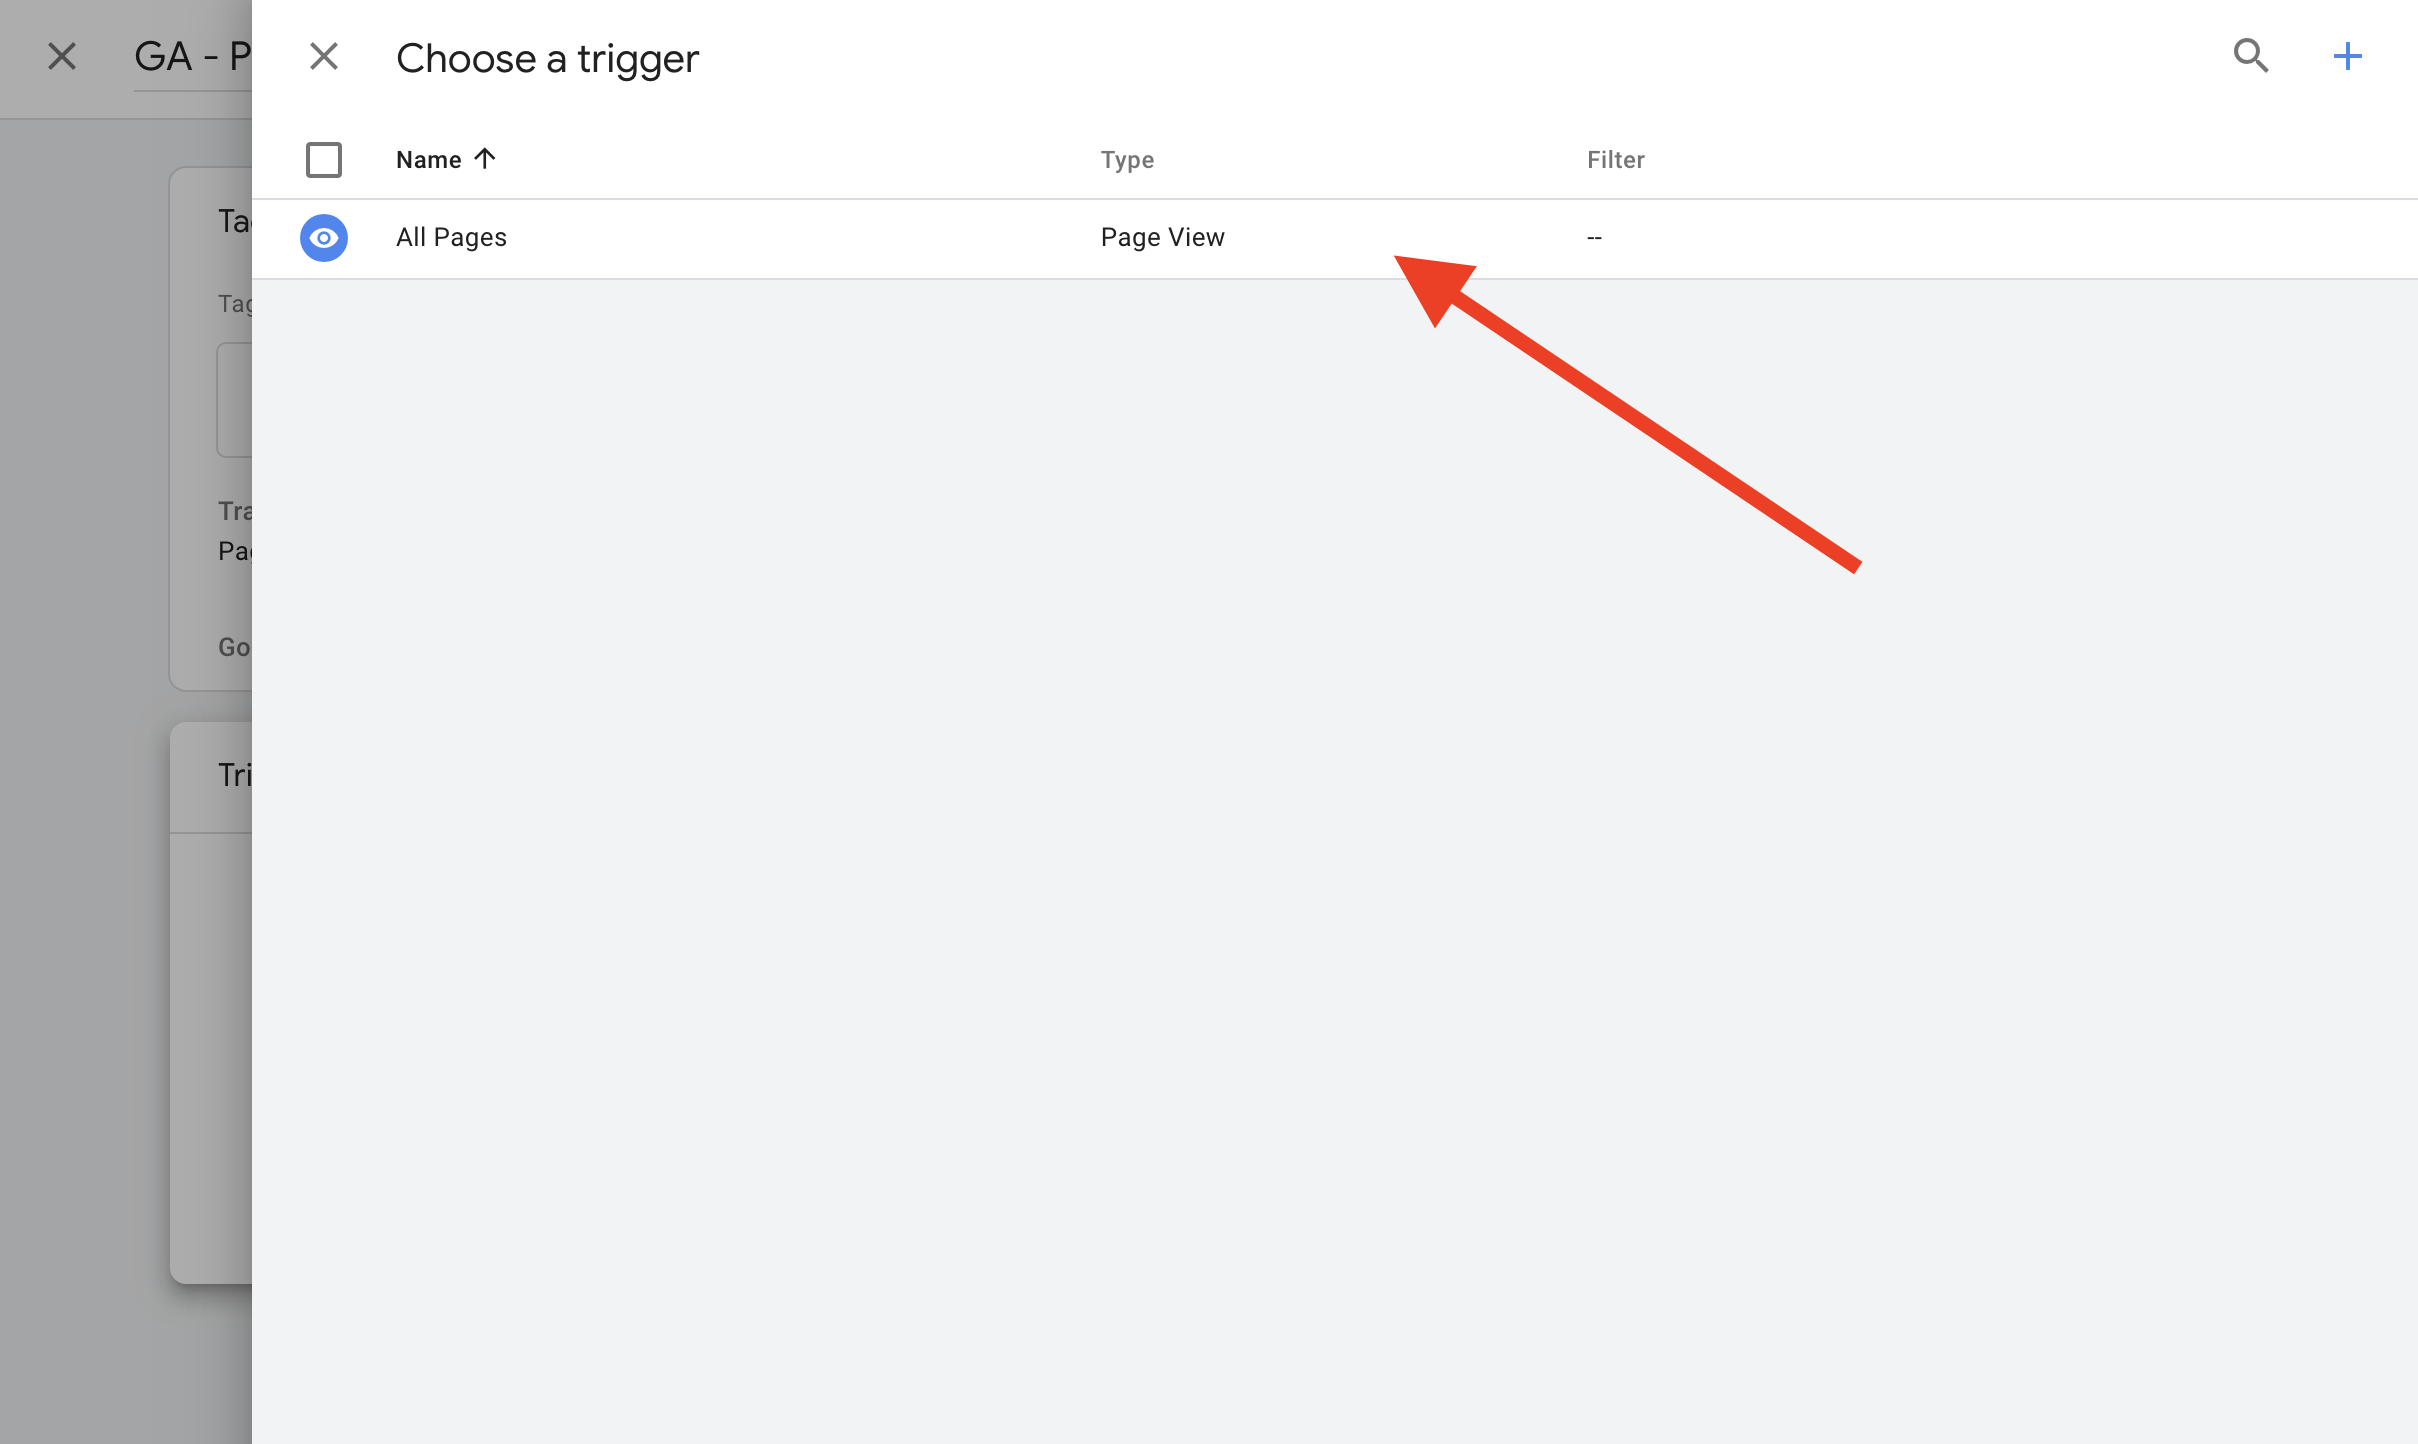
You can now save the tag.
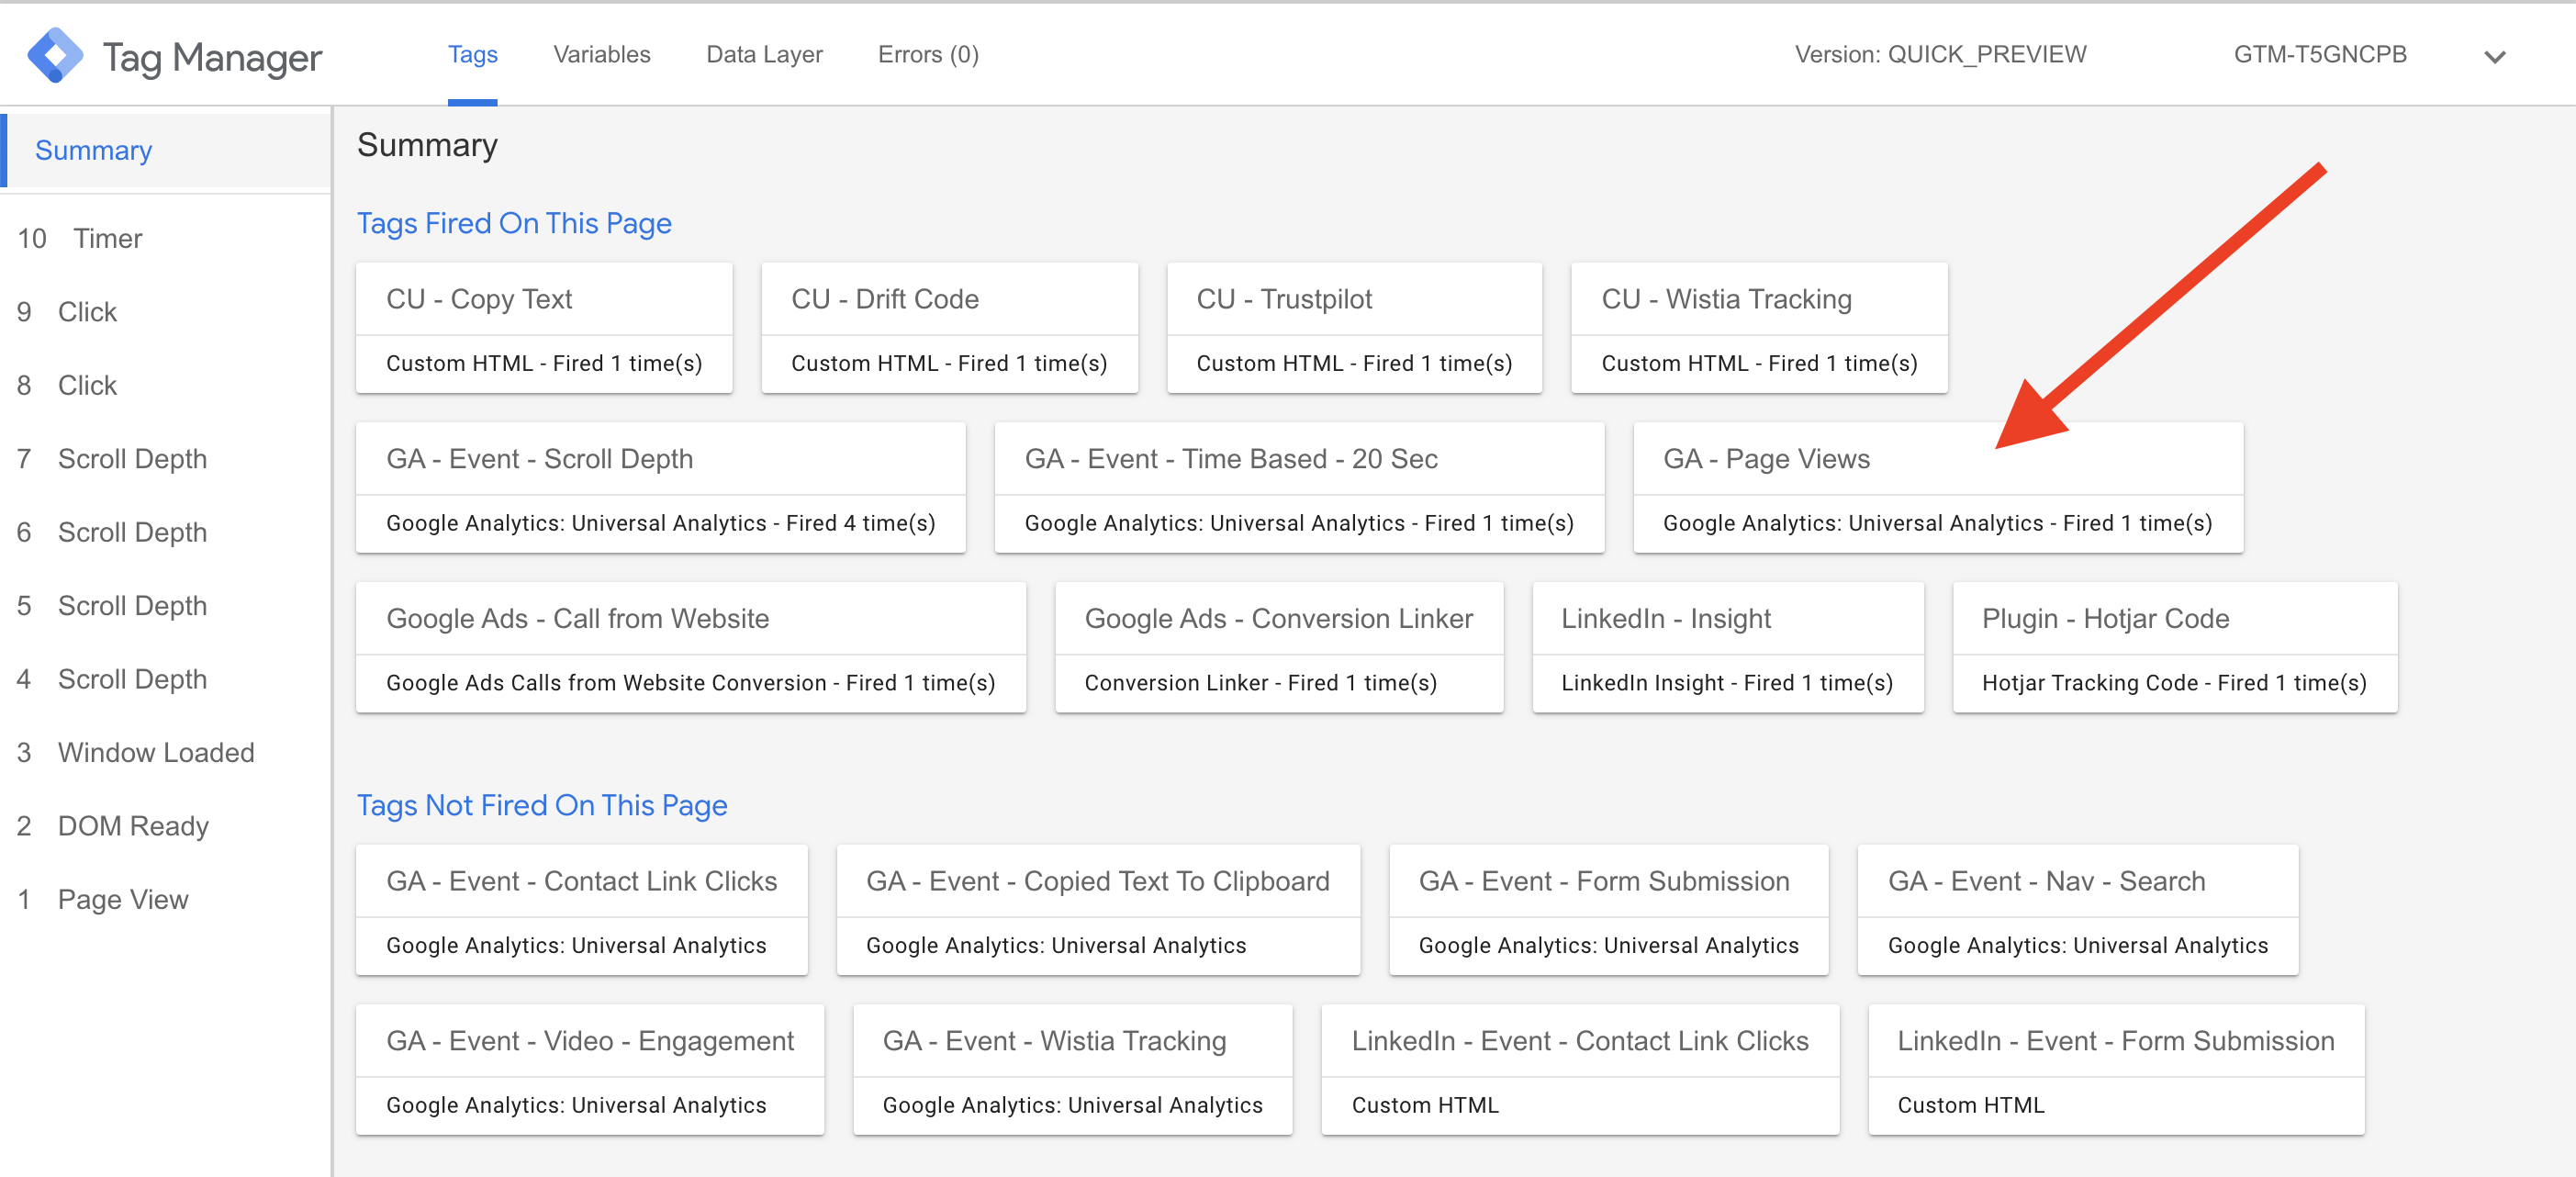
To test the tag is working properly at the GTM you can preview the tag. This will tell you if everything is working correctly.
If everything looks good there you can submit the tag. Naming it appropriately will help down the line when you want to see when and what changes took place on the account. Completing this step makes all the changes in the container live. So be sure you’re happy with what you are submitting before you do.
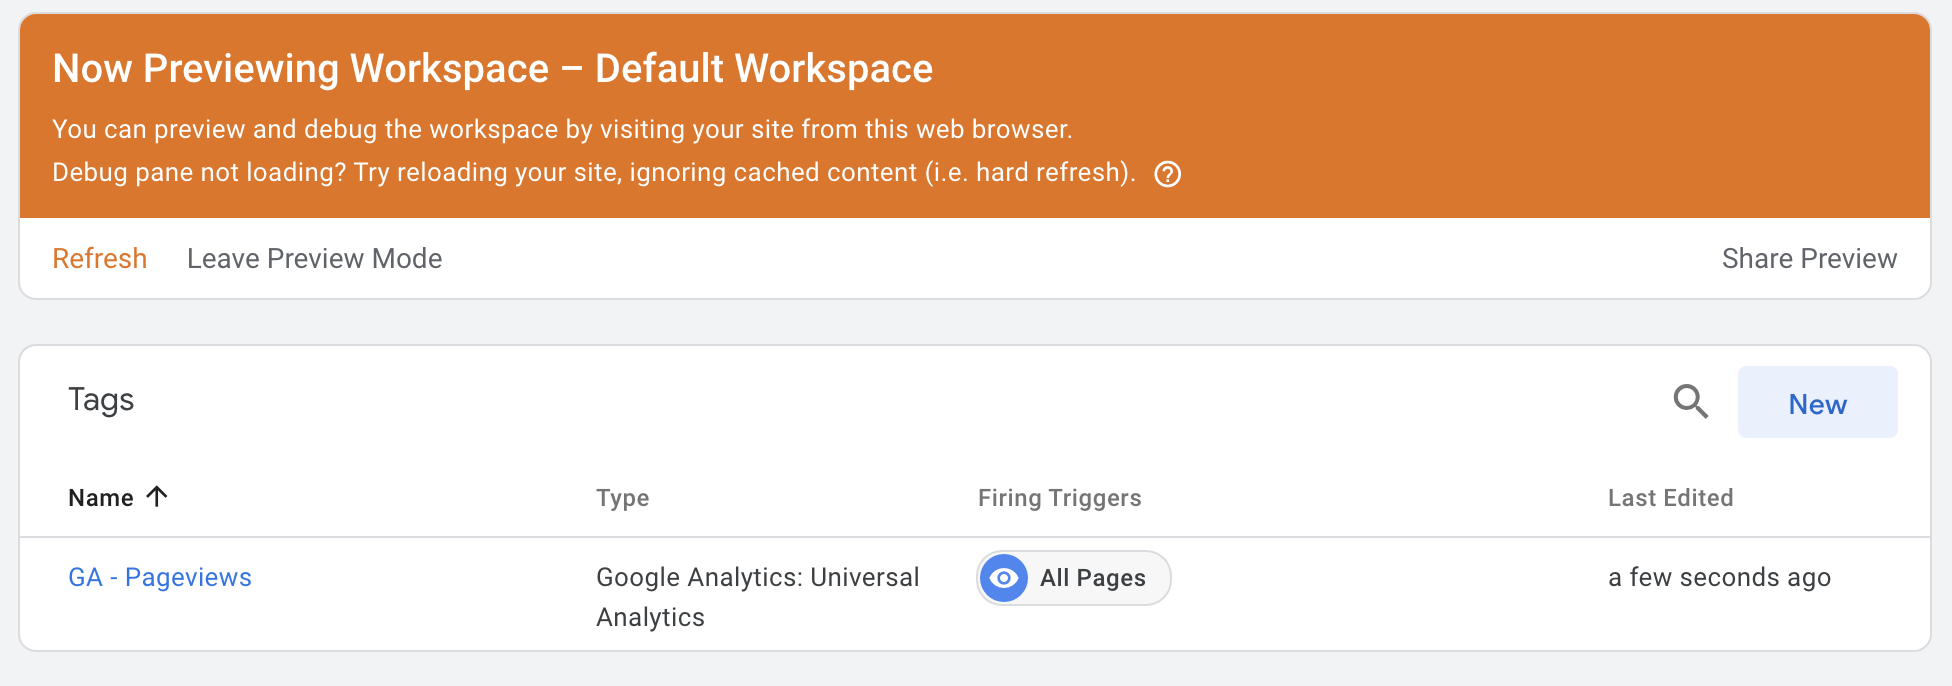
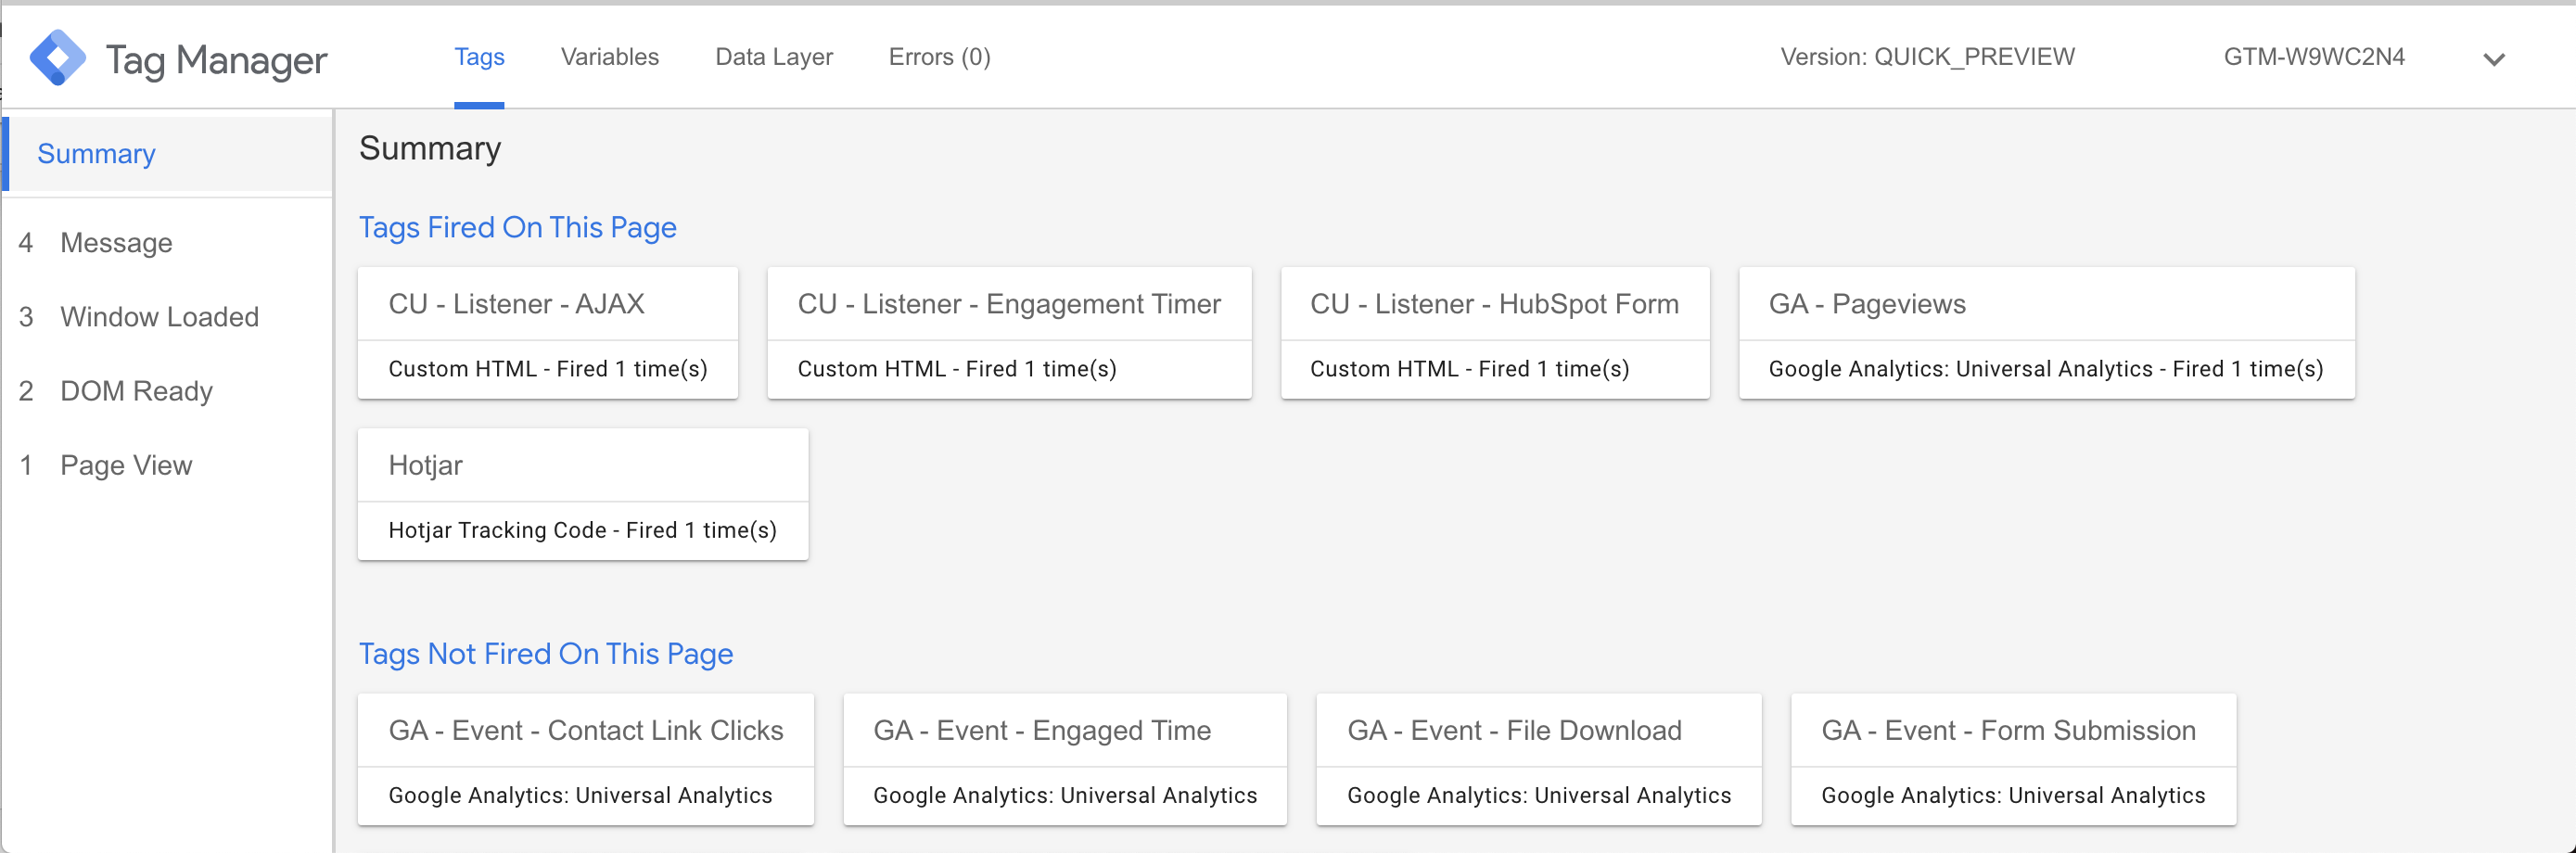
You can see in the screenshot below the Page Views tag alongside some additional tags we have live in our container. Yours is likely to be less crowded at this stage.
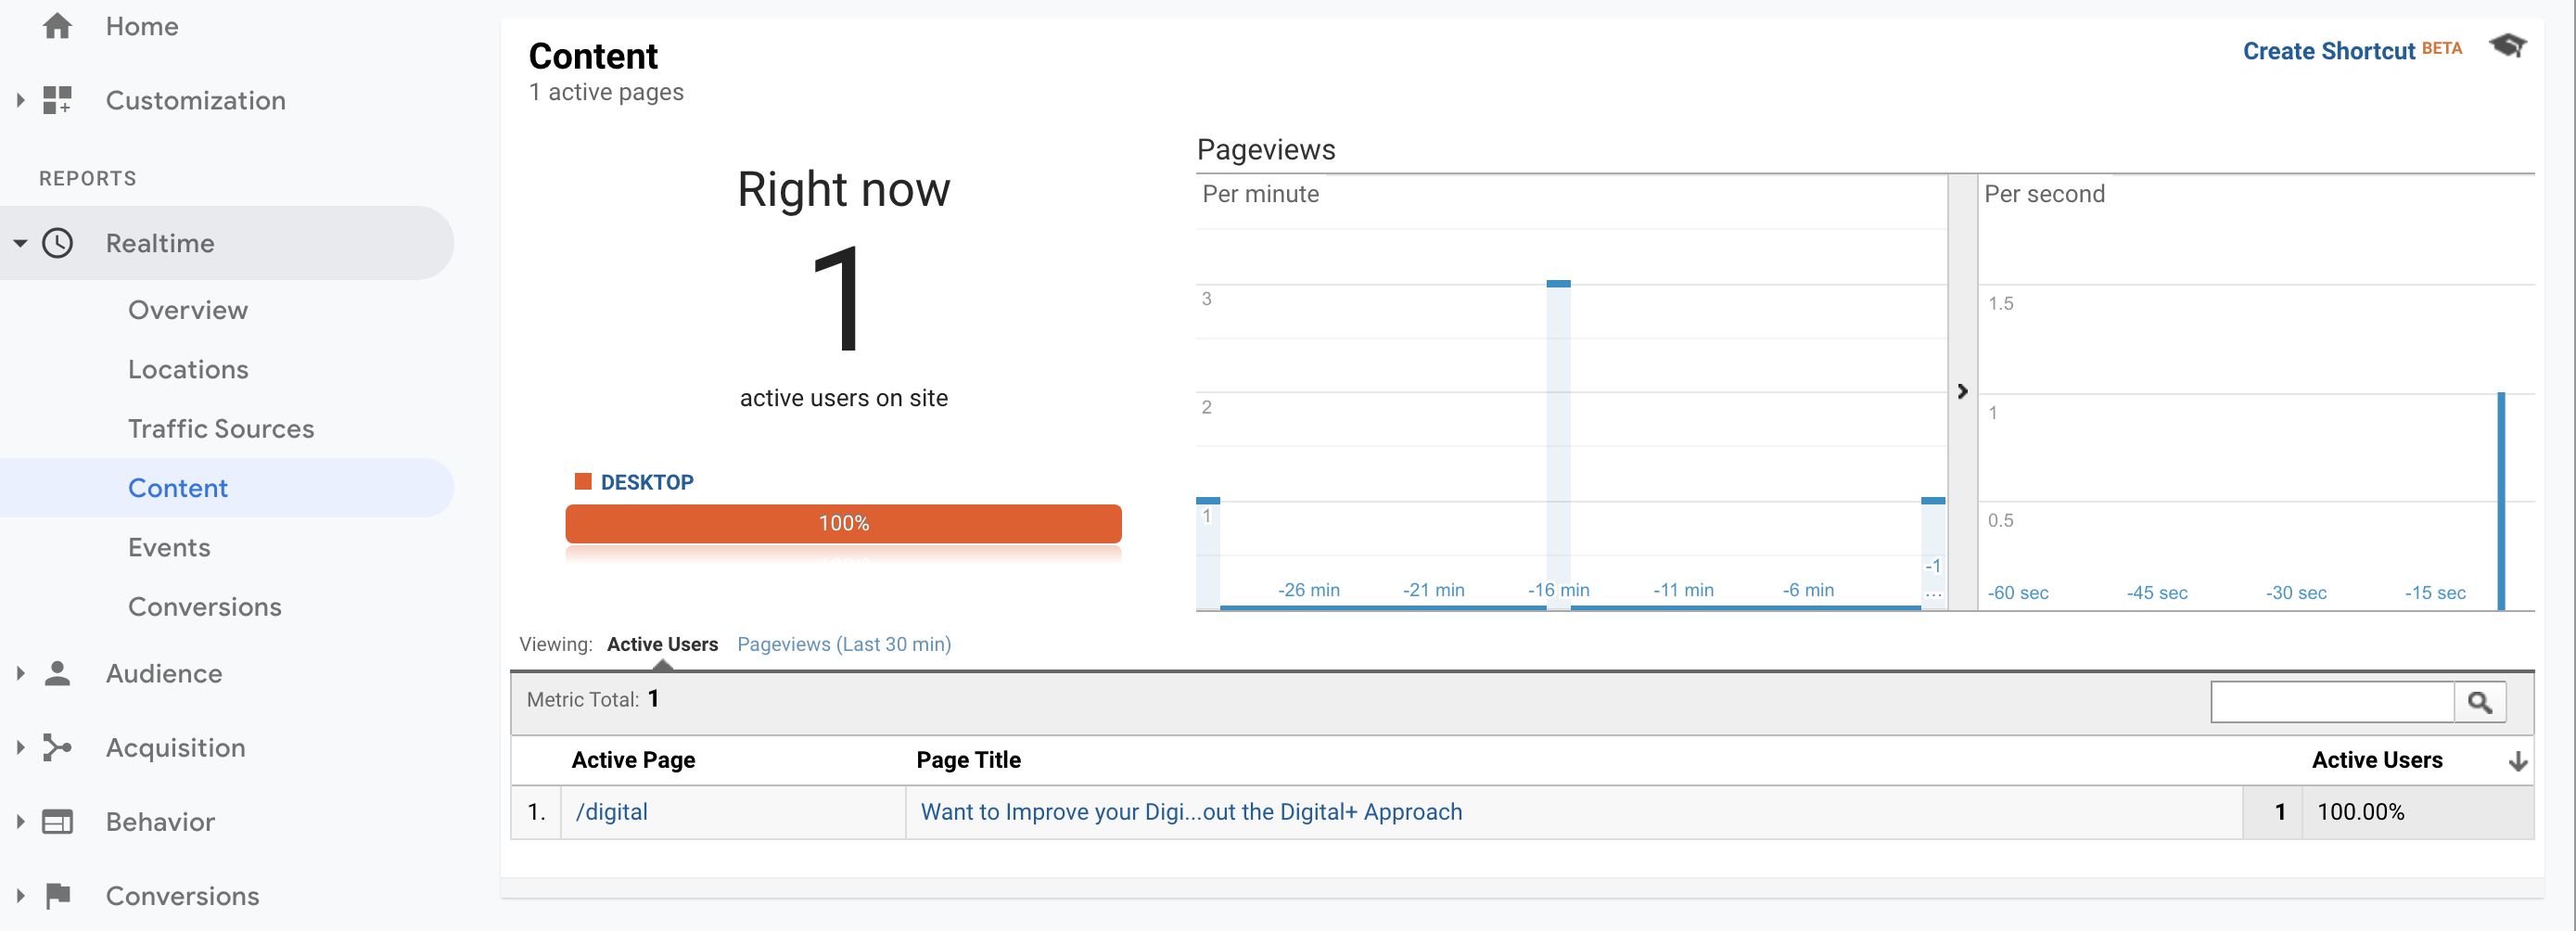
Once you’ve checked your tag is working at the GTM end you need to test Google Analytics is tracking correctly too. To do this, navigate to your Google Analytics view (ensuring it’s not filtering out your IP address). We suggest you create a test view for this purpose (it can be very helpful for testing GTM events). From here navigate to the “Real-Time” > “Content” report. If you now go on a specific page of the site, you should see yourself as a user on that page. If you do, you’ve successfully implemented your first GTM tag.
As an additional test you can now refer back to your Google Tag Assistant. On the extension you should see both your GTM container and your Google Analytics account. Remember as Google Analytics is implemented through GTM you’ll only see GTM directly in the source code of your site pages.
Step Six - Additional Tracking
Now you’ve setup the standard Google Analytics tracking you can get started on developing your additional tracking. Unlike a pageview tag, this kind of tracking usually has the “track type” of “event”. Events have a slightly different structure to “pageview” tags.
Events are made up of three main parameters.
- Categories
- Actions
- Labels
You’ll see a 4th parameter for “Value”, however, you can ignore this, unless you are setting up Enhanced Ecommerce tracking.
These three parameters represent how the information is shown in Google Analytics. When looking at event data in Google Analytics you’ll see all events have three levels which correspond with the parameters above.
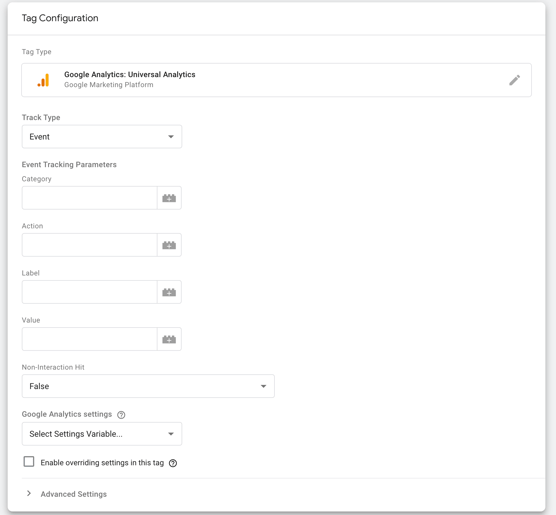
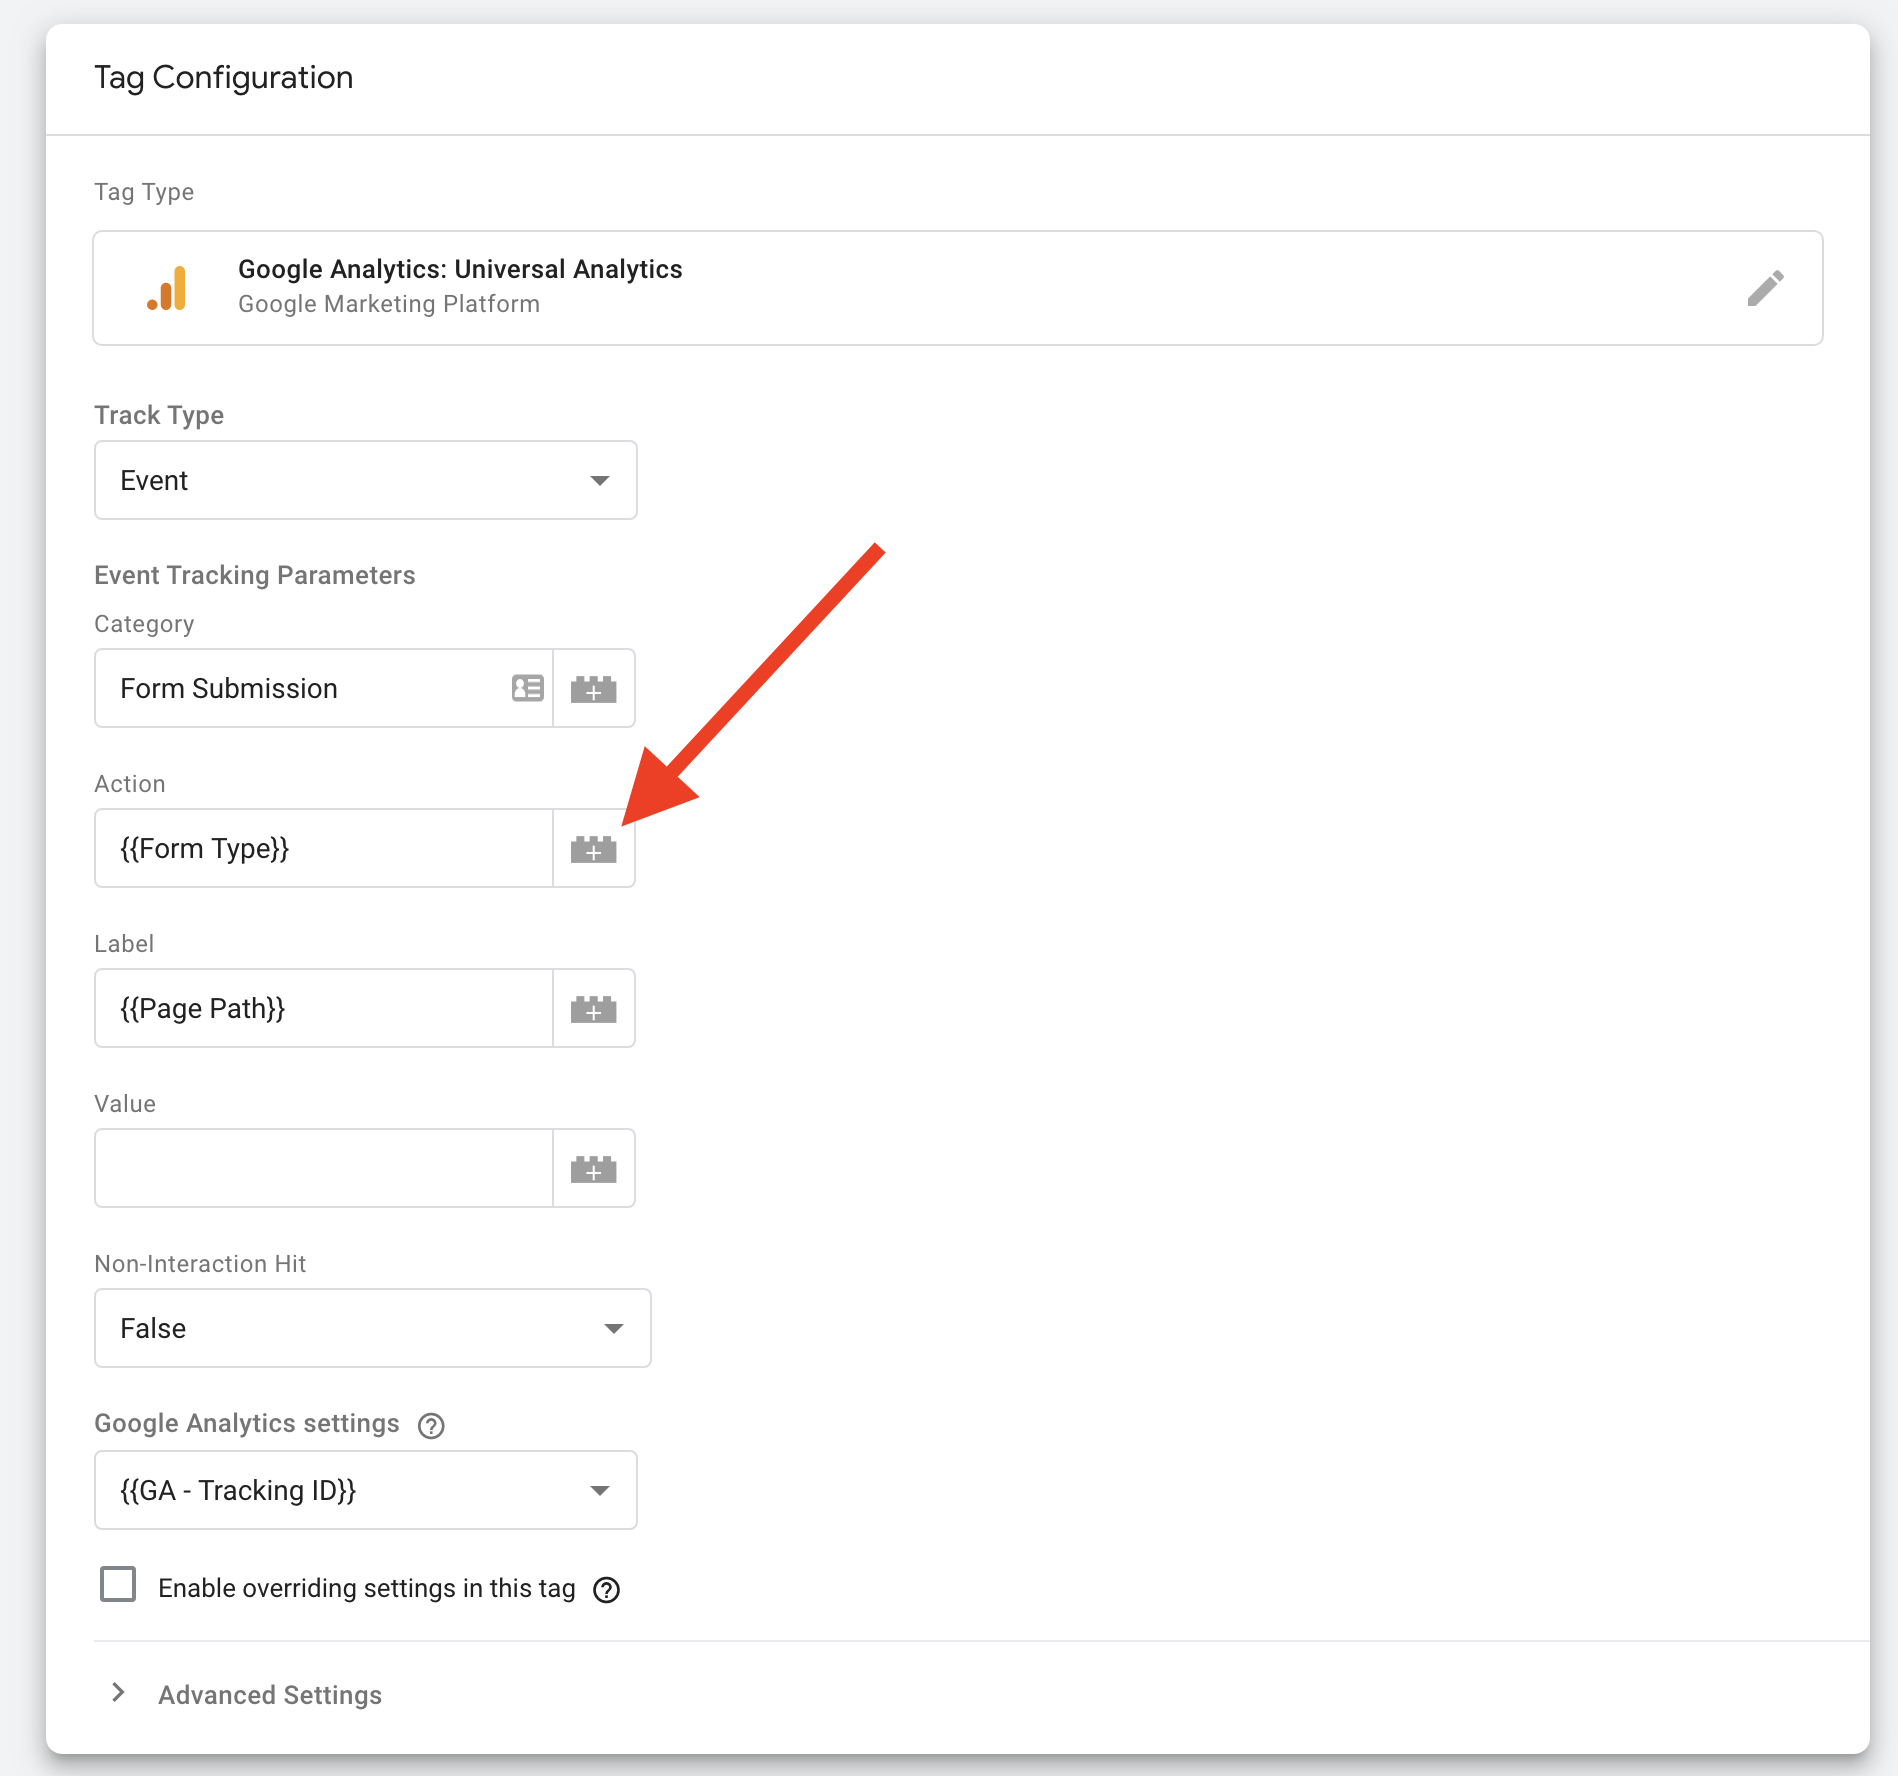
An example setup for a form submission tag is the following:

This setup uses two variables to fill in the data for the “Action” and “Label”. This allows us to dynamically fill in data. uses a lookup table to tell us which form has been completed i.e. a newsletter form or a contact us form. gives us the page the action took place on. This is helpful as it lets us know which pages are the most effective for forms in multiple locations.
Using this structure also allows us to group events together. By grouping all forms under “Form Submission” we’re able to see a site-wide view of performance. Often being too granular can be detrimental when looking for trends. Similar setups can be used for things like “Document Downloads” where you have the individual downloads as an “Action” or “Label”, keeping the data as streamlined as possible.
Dynamic variables in these parameters also help to streamline the number of tags you need in a container. Instead of having 10 tags for individual document downloads you can have one that dynamically fills in the correct information.
Once you’ve setup your event parameters as you’d like you can then start work on the triggers for your tag.
Unfortunately, “All Pages” won’t work very well for most event tags. In order to work out the best trigger you should use “preview”.
Preview will look something like this on your site. However, you’re unlikely to have some many tags on your account at the moment.
When making a trigger you should locate a unique identifier for the event you want to track. In the case of a form submit this might be something like the Form ID or the Click Class.
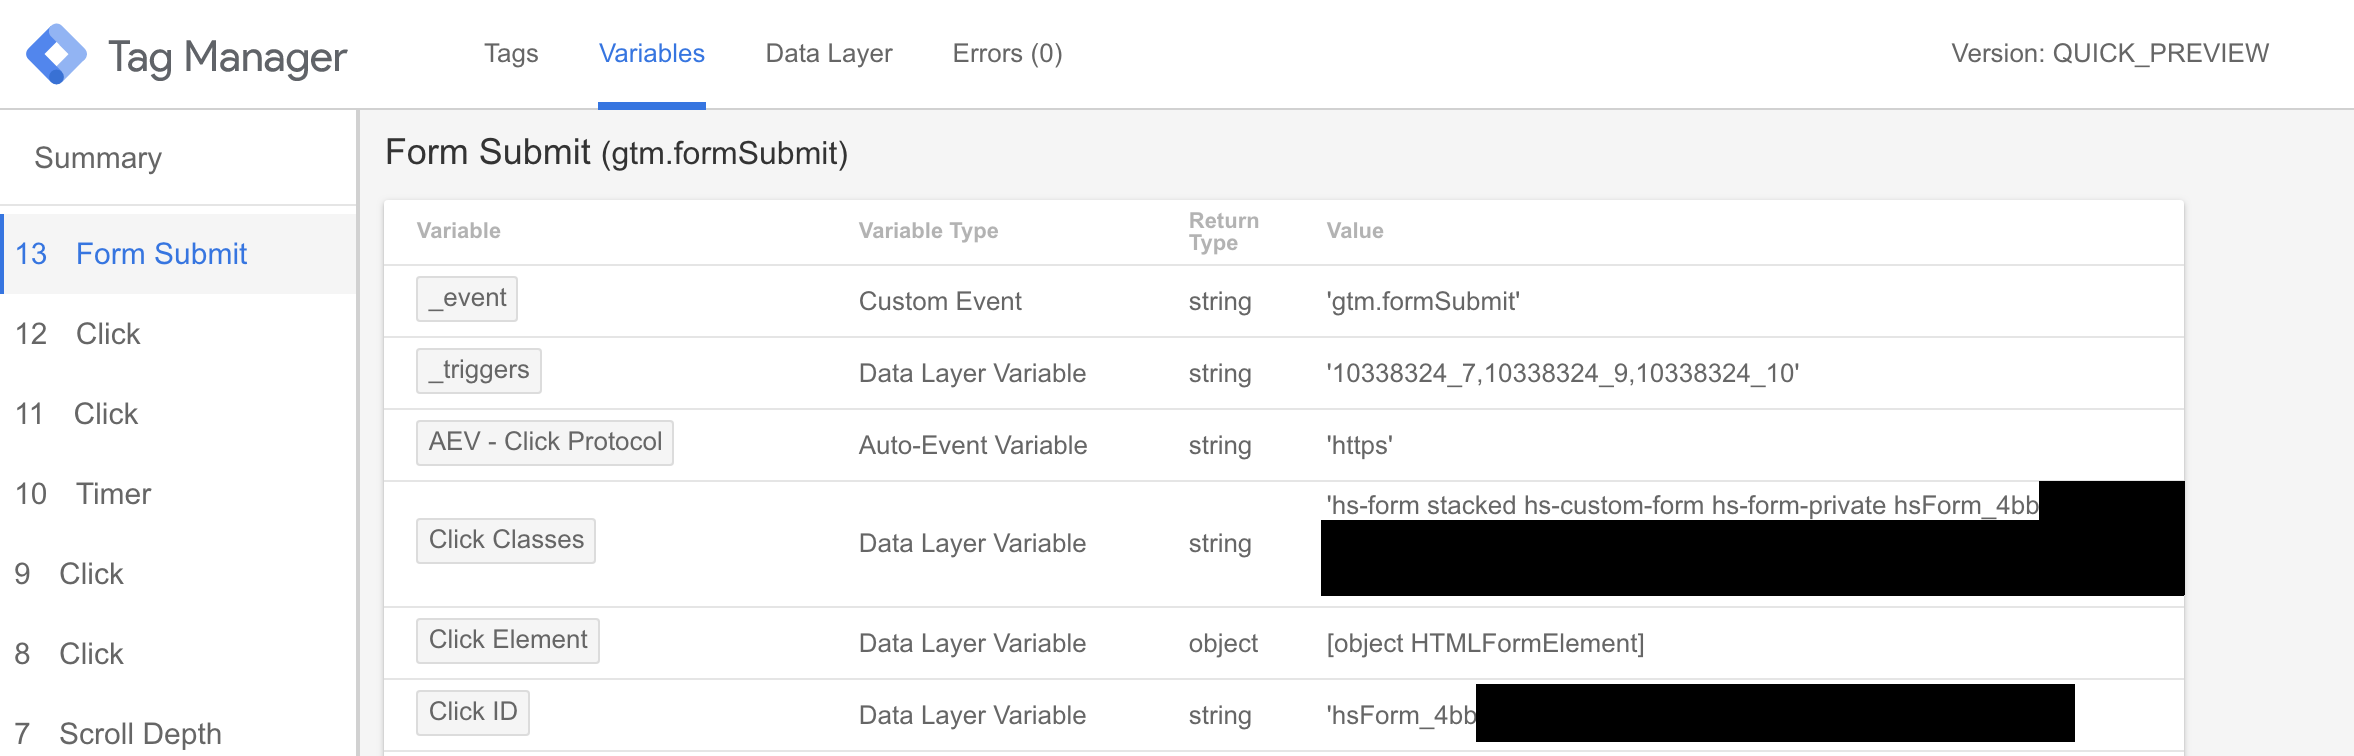
GTM automatically recognises a number of form submissions. These will appear on summary panel as a “Form Submit”. If you select this action you can then see the details of this event.

Once you’ve selected the event “form submit” you can click on “Variables” in the header of the preview panel.
In the case of this form we can use “Click ID” to identify the form engagement on the page.
Copy the “Click ID” value as we’ll now use this to make a trigger for the Form Submission Tag. We've hidden the exact value for security reasons.
Go to triggers and select “New”.
Click on the trigger configuration box and select from the User Engagement section “Form Submission”. This trigger automatically has selected “all forms”. We now want to change this to “some forms” and enter the “Click ID” we just located.
Then select “Click ID” as the variable. If it’s not shown natively you can choose it from “Choose Built in variable” in the dropdown.
You can now update the condition to whatever suits your form best. In the case of our form we know all the forms we want to track have a “Click ID” which starts with “hsForm_”. This is because our forms are from HubSpot (all HubSpot forms follow this structure). The number afterwards can then be used to define specific forms. As we want to track all forms on the site through this one tag, I’ll change the value in the box to just “hsForm_” – ensuring the condition is “contains”.

Your trigger may look different depending on what type of forms you want to track. It’s important to change the tag from “all forms” to “some forms”, as GTM has been known to get it wrong. In some cases, Google might think a submission which isn’t from a form happened. Ensuring you specify something like the “Click ID” ensures this doesn’t happen.
You can now save this trigger and return to your tag and select this as your trigger. This tag will now fire whenever a form is submitted.
Now we want to be able to see which specific forms have been fired as the “Action”. To do this we want to create a “Lookup Table” variable.
Navigate to the variable section of GTM.
Click new under user-defined variables. Then want to select Lookup Table.
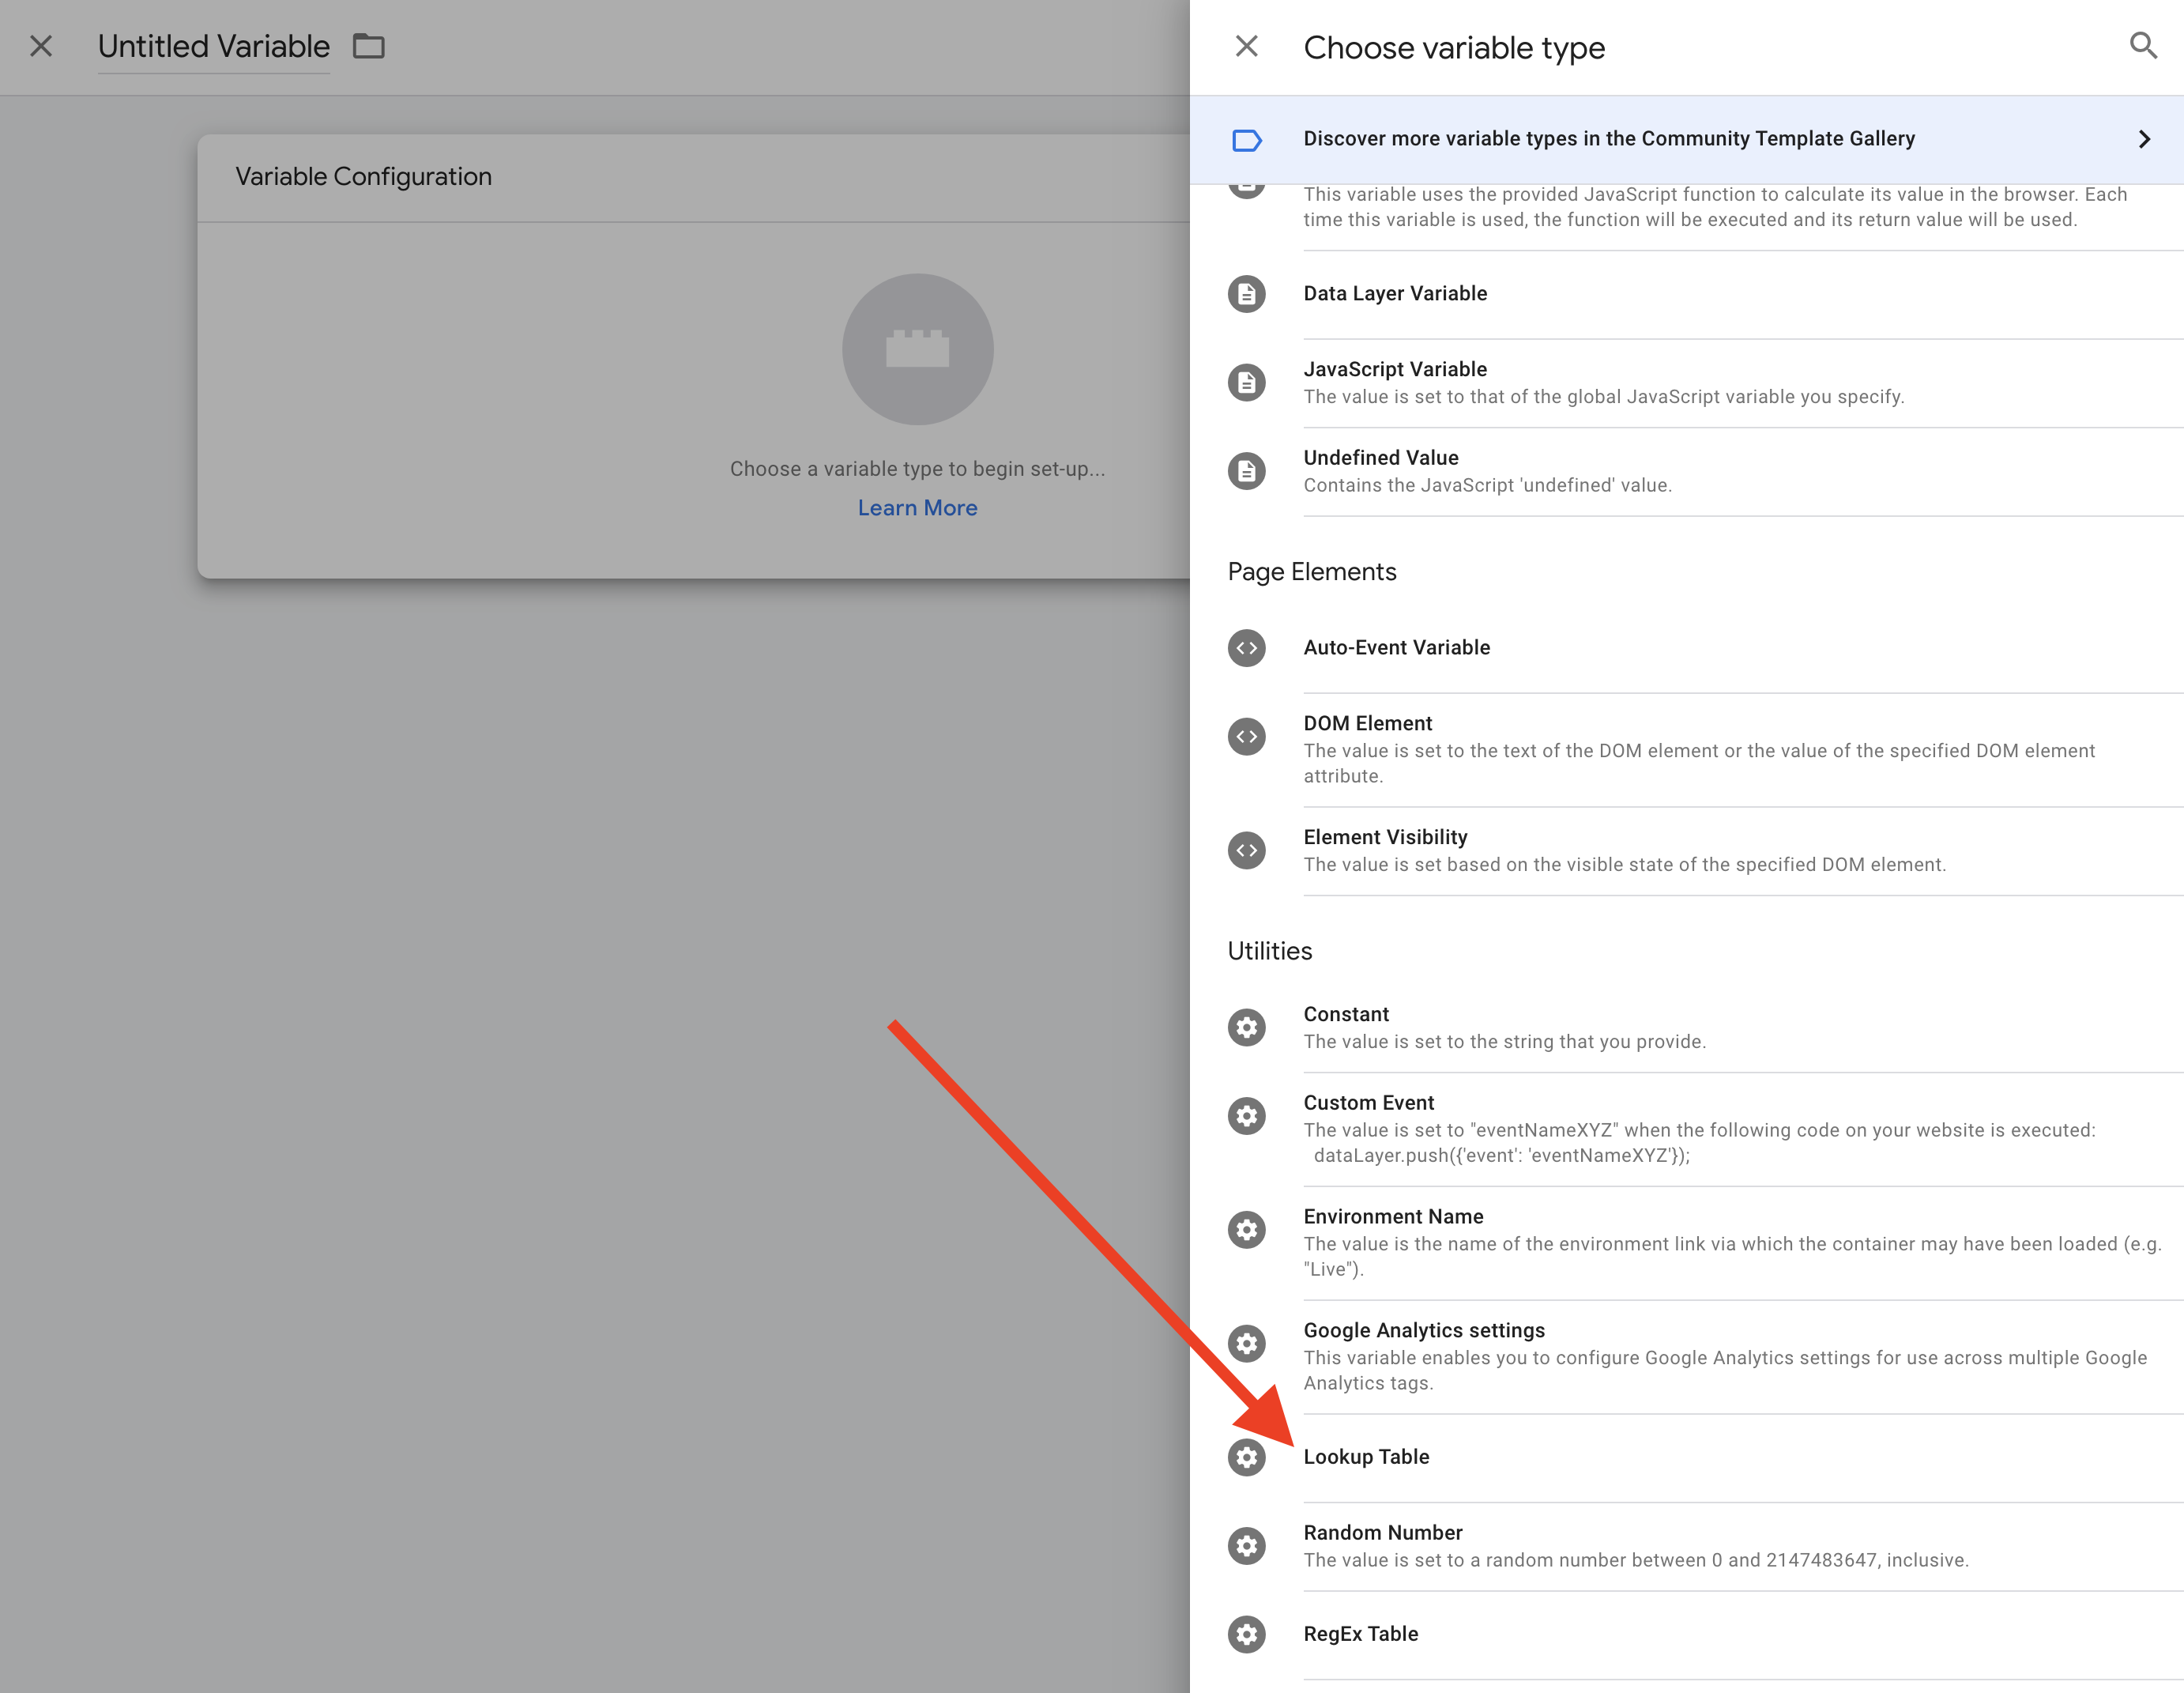
From here select the correct input variable. In the case of the forms we want to track it’s the “Click ID” which is the defining aspect of the form. So, you’ll need to select this as the input variable.
In the input section you should put the exact “Click ID” for each form you want to see. In Output you should put the descriptive value you want to see in Google Analytics. This might be something like Contact Us, as this is much more helpful than a random number.
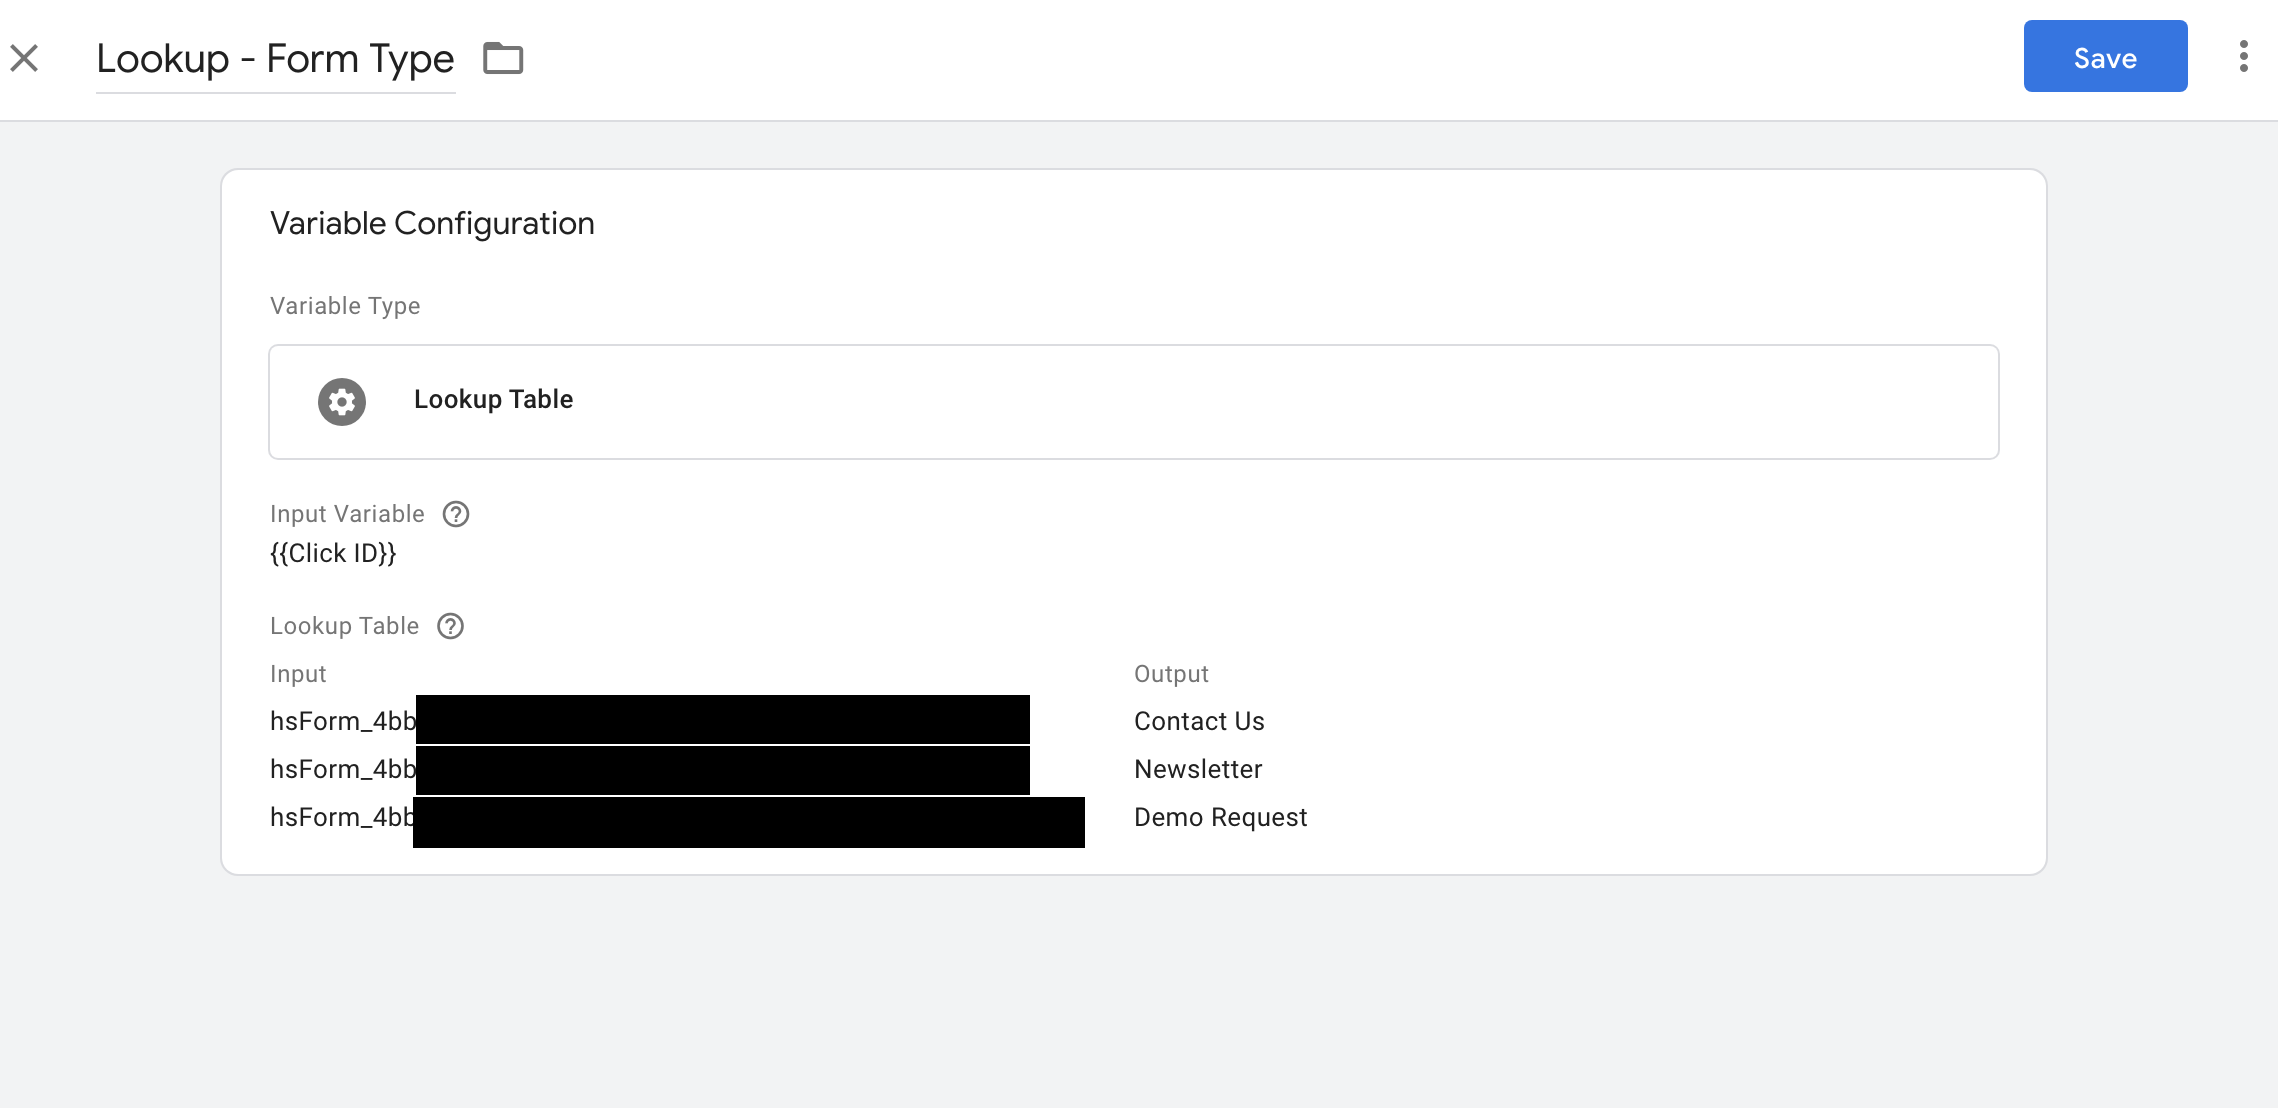
Save the variable.
Return to your form tag and click the Lego piece in the Action parameter box. From here you can select the variable you just made. Save the tag.
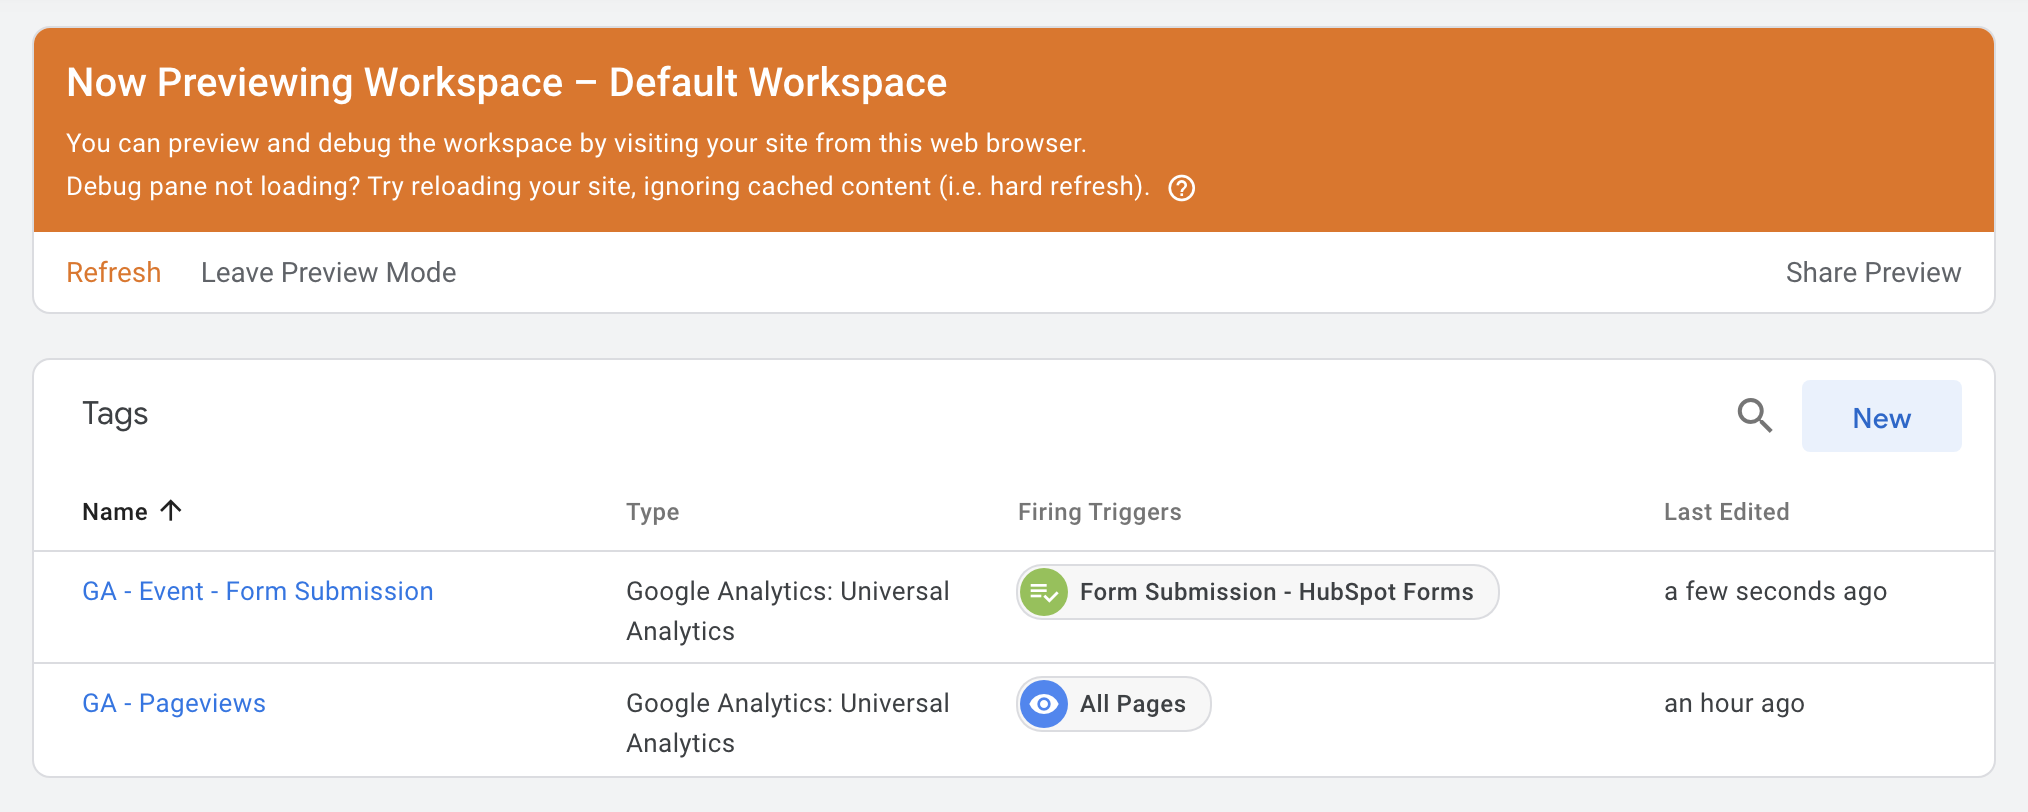
Now it’s time to test. To do this select preview again. If it’s already active, then you’ll need to click refresh – otherwise the changes you made won’t become active in the preview.
Now trigger the tag by clicking submit on the form (depending on your setup you may need to fill out the form fully). From here you can select “Form Submit” from the summary tab. You should then see your tag firing. If it fired now, click on the tag.
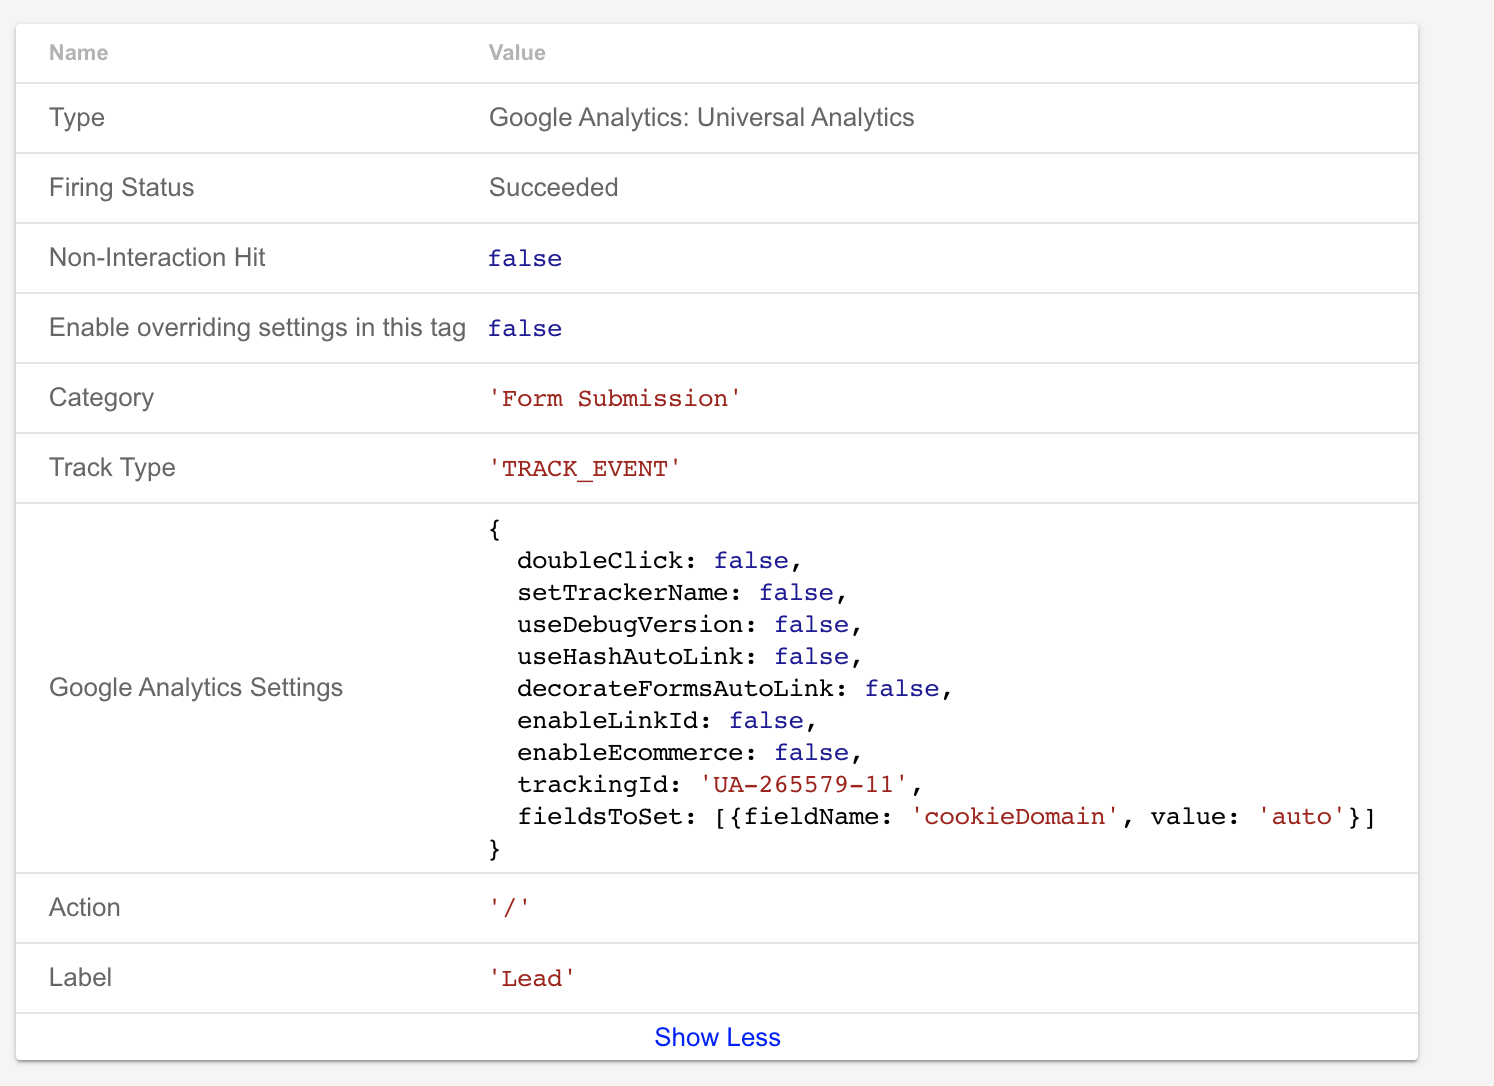
Looking at the tag that fired on “Form Submit” you should now be able to see the properties (click show more if needed). Here you can check the lookup table is working and saying the right form. Anything you see here will go into Google Analytics (so check everything looks right). In the screenshot below the lookup table has been used for the label and not the action. How you order these is up to you.
If you’ve got a field coming up as undefined then you need to double check your setup and the attributes you selected (whether it’s “Click ID” or another attribute) are exactly correct. The nature of GTM means it is easy to make mistakes and the tag won’t work if one tiny thing, even a single character, is wrong.
Step Seven – Selecting Objects
Being able to select an object on your website is key to tracking specific events. Whether it’s a form submission button, a CTA button, video element or link.
When selecting an object for a trigger in GTM you need to make sure you're selecting something that’s unique. This way you can ensure that your tag won’t misfire on something you don’t want to track. A great example of this is with AJAX events. When an AJAX event happens, something - which might usually require a page reload to trigger - will happen on the current page automatically. This often happens when a form is filled out or you select a filter option from a dropdown on a page.
So, if you want to track when a form is submitted (that uses an AJAX event) you’ll need to specify another detail, not just that it’s an AJAX event. Otherwise you could be sending data to Google when someone selects something from say a dropdown menu item, potentially affect the validity of your data. Something you could select as a requirement on an AJAX event, to select a form only, could be its “Form ID” or “Click Class”. It’s unlikely to be a dropdown and a form will have the same “Click Class” so this can be a great option in some cases.
Listeners, what are they?
Listeners in GTM allow you to see and select certain objects which otherwise might be invisible to GTM. An AJAX for example isn’t natively tracked in GTM, unlike say a normal Form Submit. Because of this if you trigger a form and nothing happens you might need to install something like an AJAX tag on GTM. This is fairly straightforward if you use a plugin such as the one provided by Lunametrics.
Step Eight – Governance & Structure
When you start to build your GTM account up it can be very simple and clean. However, the longer you have that account it can become harder to manage. Although GTM will almost always be easier to control than if all the code on your account was directly on your website, following some best practices can ensure the longevity of the account and your sanity!
- Follow defined naming conventions
- Use folders – group by channel or use i.e. Google Analytics, Plugins, Google/Bing Ads, Facebook
- Streamline Tags – if possible, combine multiple tags into a single dynamic tag.
- Keep multi-country sites in one container – in practice we’ve found this to be easier.
- Keep tags, triggers and variables under similar names (that way you can easily find what you need).
- Delete redundant and old tags – if they’re no longer needed streamline your account and do a bit of spring cleaning.
- Backup – just in case
- Keep your version stack clear – name each version correctly with something like “Website Tracking – V1” or specific to the change you made “Facebook Pixel Implementation”. This way if you need to revert back to a previous version you can easily find it. You can also use descriptions for a more detailed explanation.
By following these tips you can help to ensure your container stays well organised and any mistakes can be easily amended.
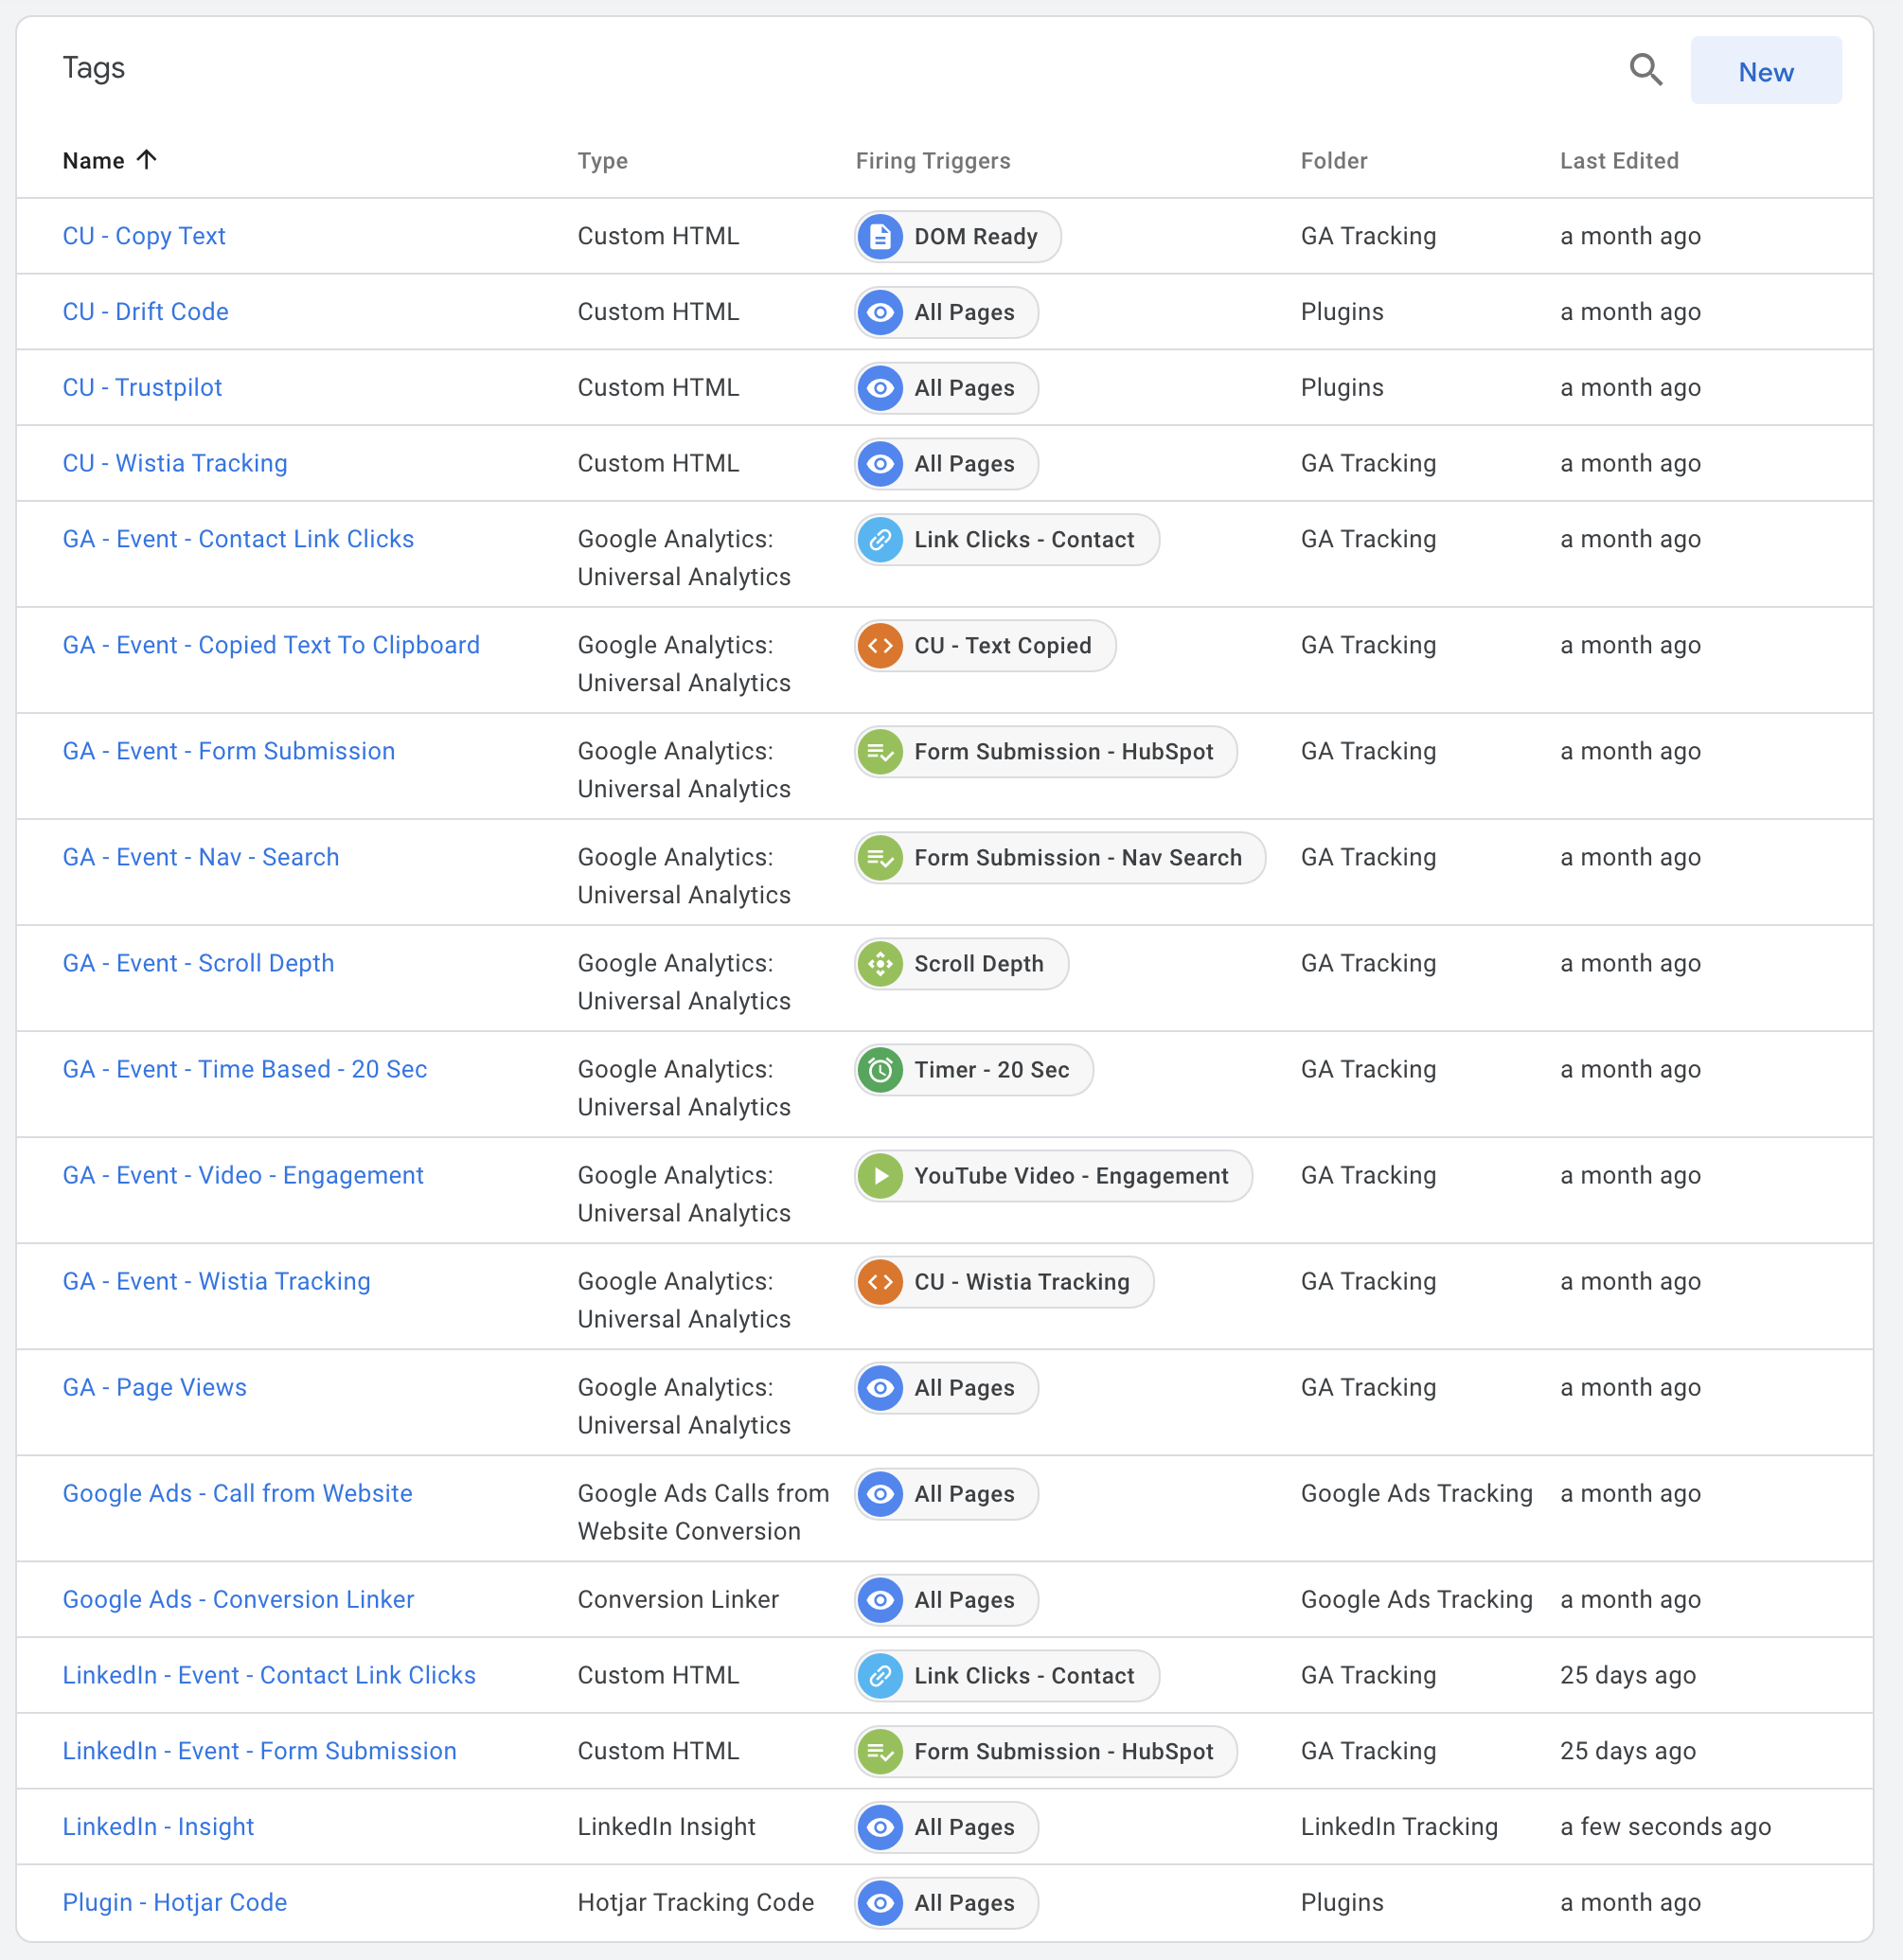
See below an example of a fairly mature account that's been structured well.
Step Nine - Test, Test, Test
Once you’ve implemented the tracking you want on GTM and tested it in ‘Preview’ you can then start testing how your tracking is coming through on GA.
When doing this you should repeat the steps mentioned in the “first tag” section of this post.
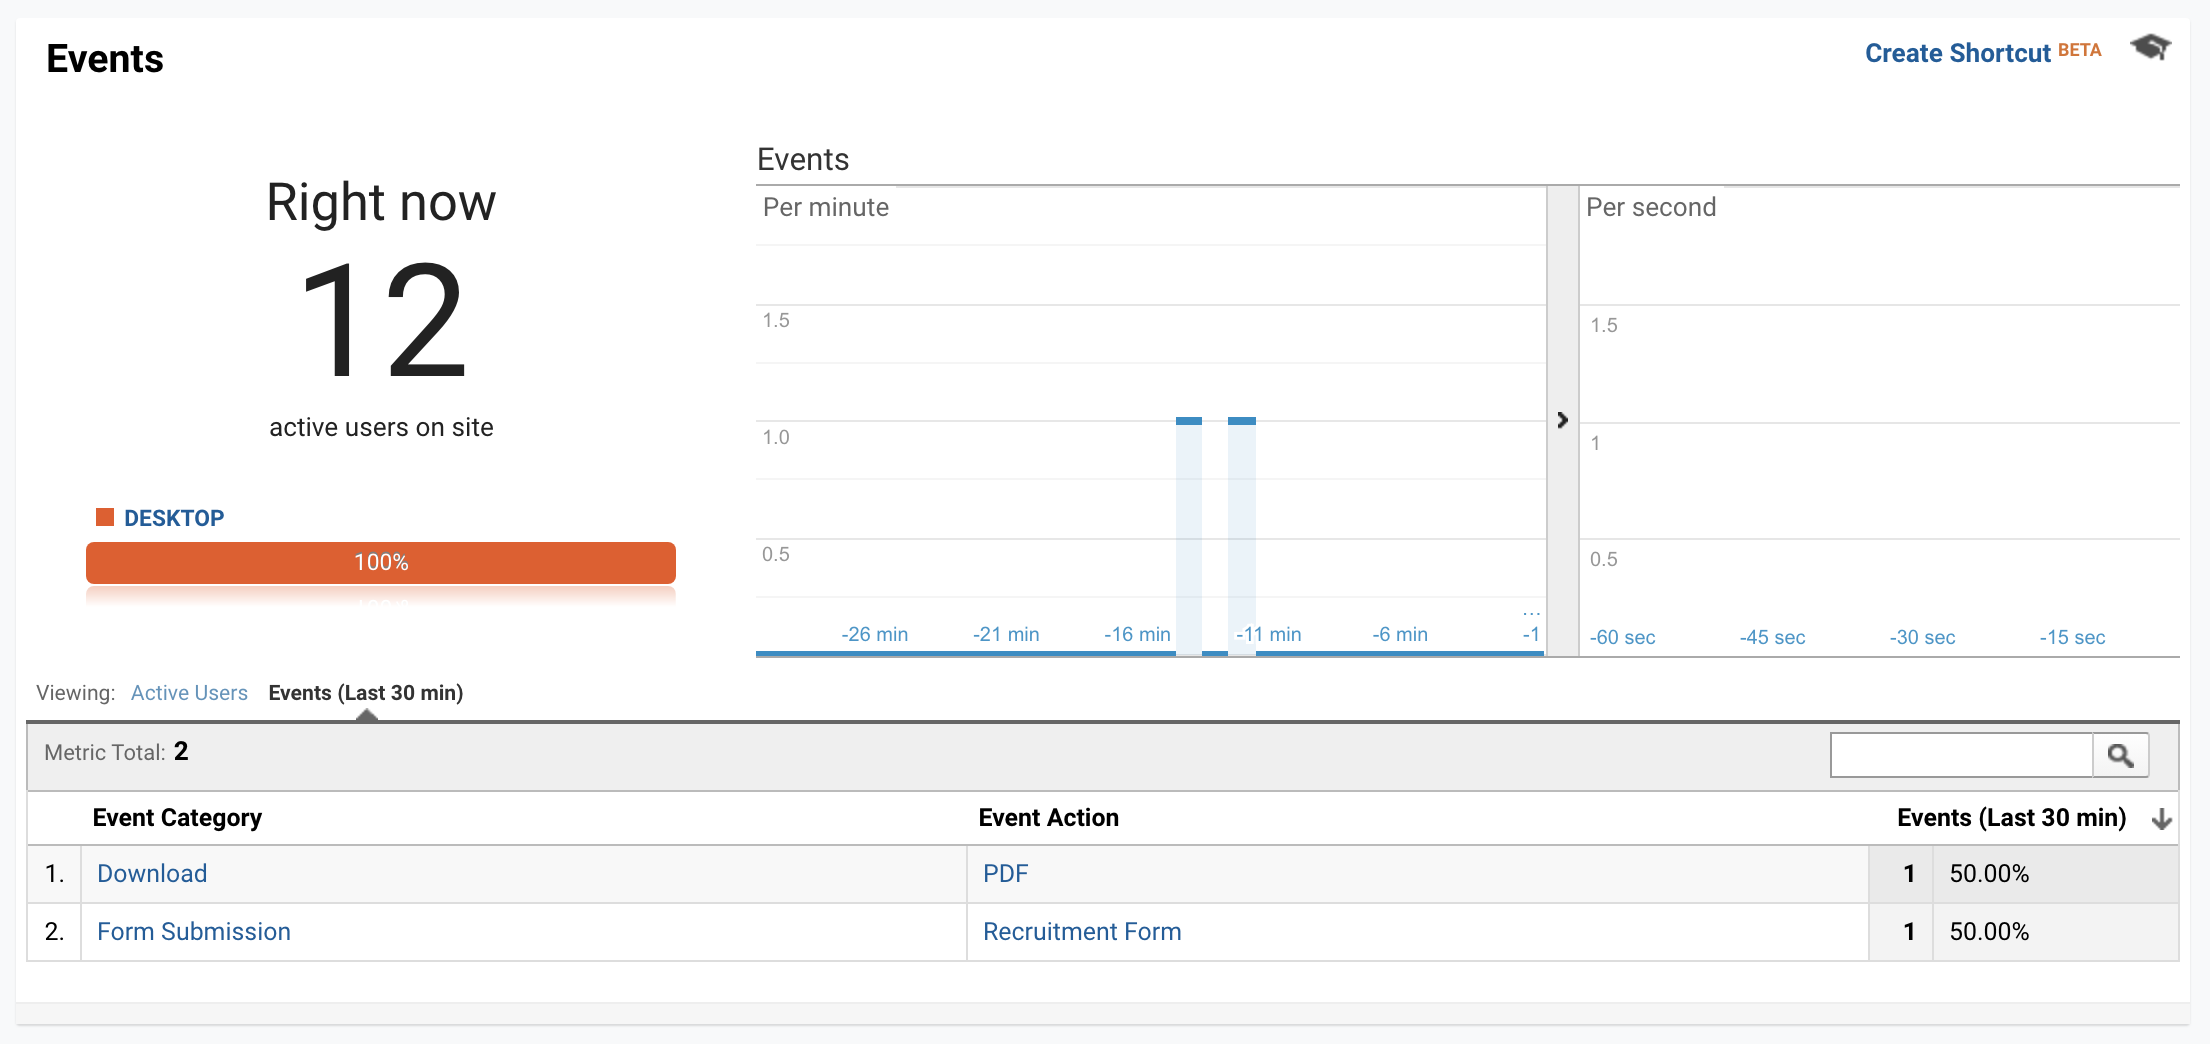
Whilst in preview, trigger the tags you want to test on your website. Check they fire correctly and send the right data in preview.In Google Analytics look at the ‘Real-Time’ > ‘Events’ report to see the events coming through. You can’t see all the data, but you should be able to see the event category and action. This is enough to test everything is coming through correctly in GA. You’ll have to wait for Google Analytics to populate to standard ‘Behaviour’ > ‘Event’s’ report to see the labels of your events.
Go through each tag you want to fire and ensure you’re seeing these events come through in GA. If anything doesn’t look right or doesn’t appear, you’ll need to check how it’s firing in the GTM Preview mode. The best way to look at this is under the specific tag and then ‘Firing Triggers’. You can then see a tick or an ‘x’ for what worked and what didn’t. If you’re seeing an ‘x’ you’ll need to amend how the event fires.
Once you’ve checked everything is correct you can now click “Submit” on your GTM container. This will now set all your tracking live.
Step Ten – Implement Goals
With your tags and tracking live on your site, you can now think about setting up some goals. Remember, earlier on we talked about how we only want to setup ‘proper’ goals and not micro-goals? We would also recommend leaving your tracking to run for a week or so on a test view in Google Analytics. This ensures you don’t mess up the data in your master or filtered views. In this period, you can review the data sent to GA and ensure there’s no mistakes before committing.
When setting up a goal you should complete the following process. For this explanation we’ll go over setting up a goal for the Form Submission tag we looked at earlier.
Go to your Google Analytics view (or test view if you’re being careful). Go to the admin section. Under the view column select goal. Click “+ NEW GOAL”. Then select “Custom” under Goal set-up and click continue.
Name your goal (preferably something descriptive that will make sense to everyone) in this case we’ll name it “Form Submission – Contact Us”.
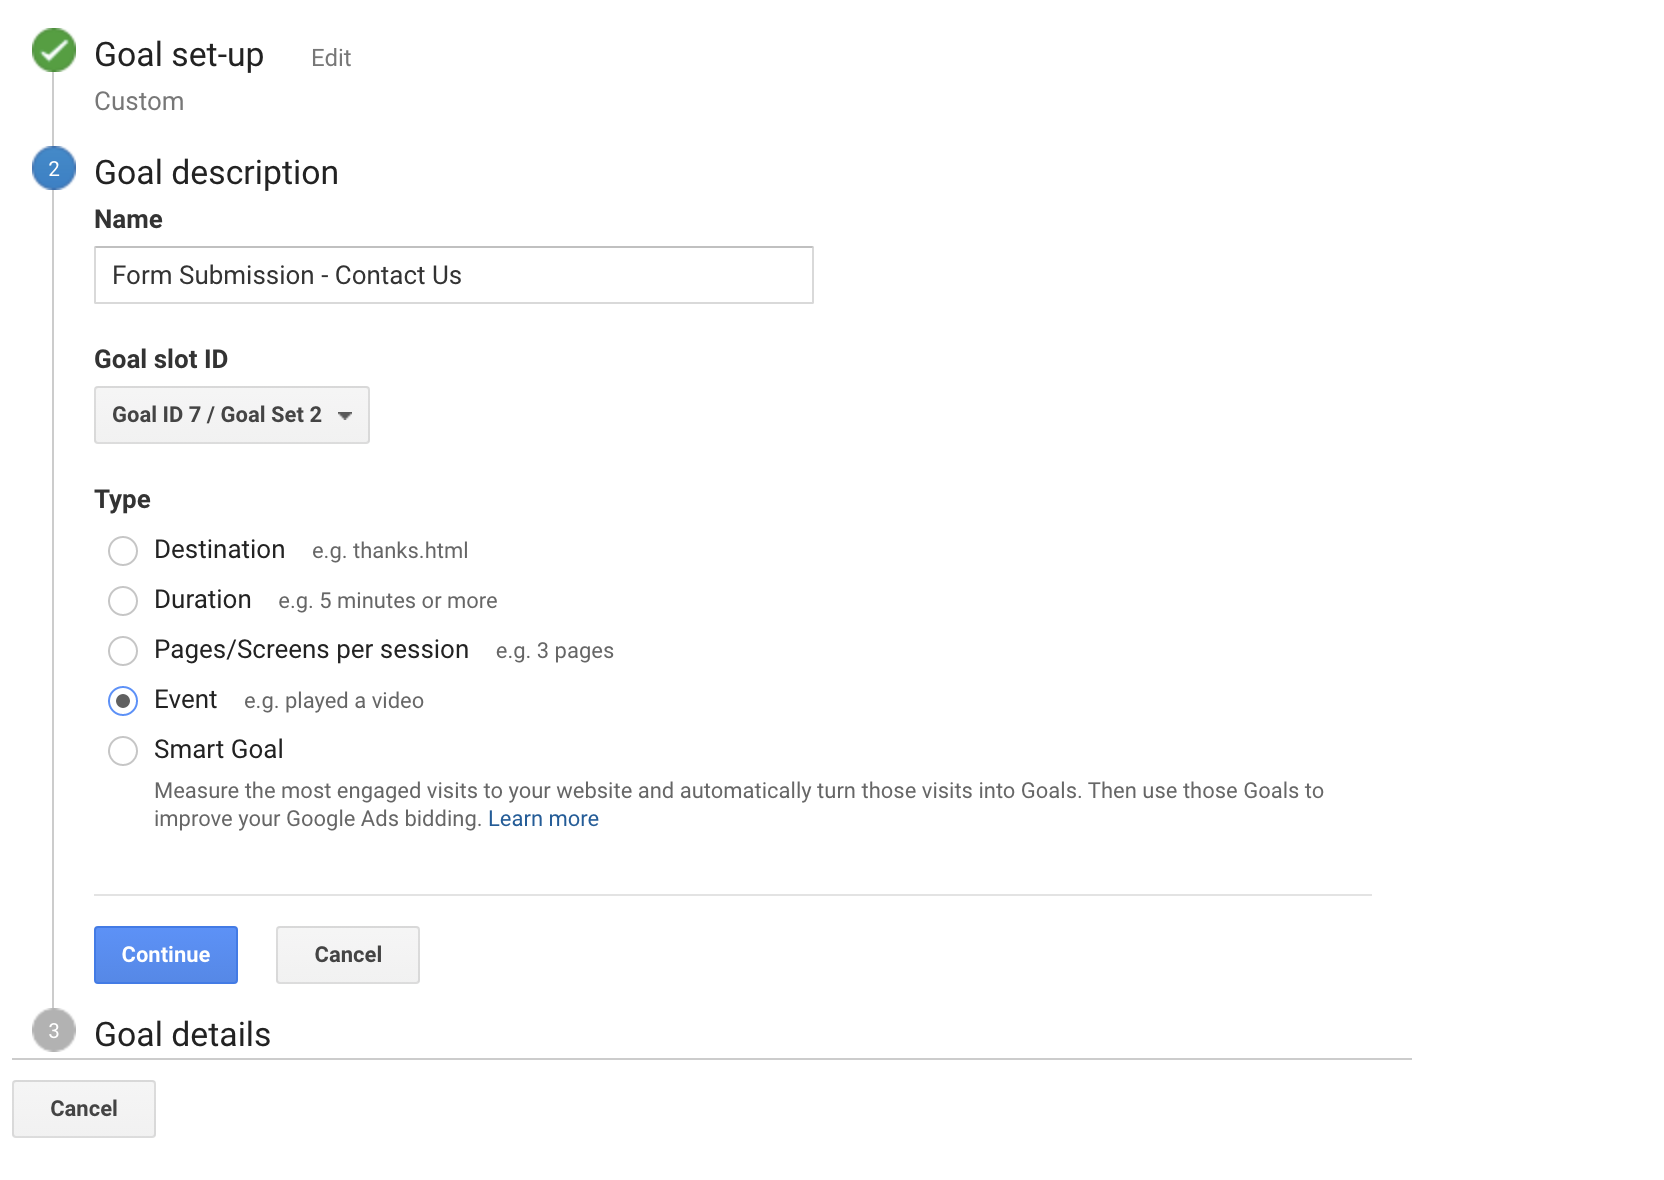 Select “Event” from the type options and click continue. Another common option is destination which can be used for order confirmation pages etc…
Under Goal details you’ll now need to define the event conditions to trigger the goal. In the case of the Form Submission we’ll add in:
- Fill in the Category of the event you want to set as a goal. For this goal we’ll add in “Form Submission”.
- Fill in the Action you want to set as a goal. For this goal we’ll add in “Contact Us”
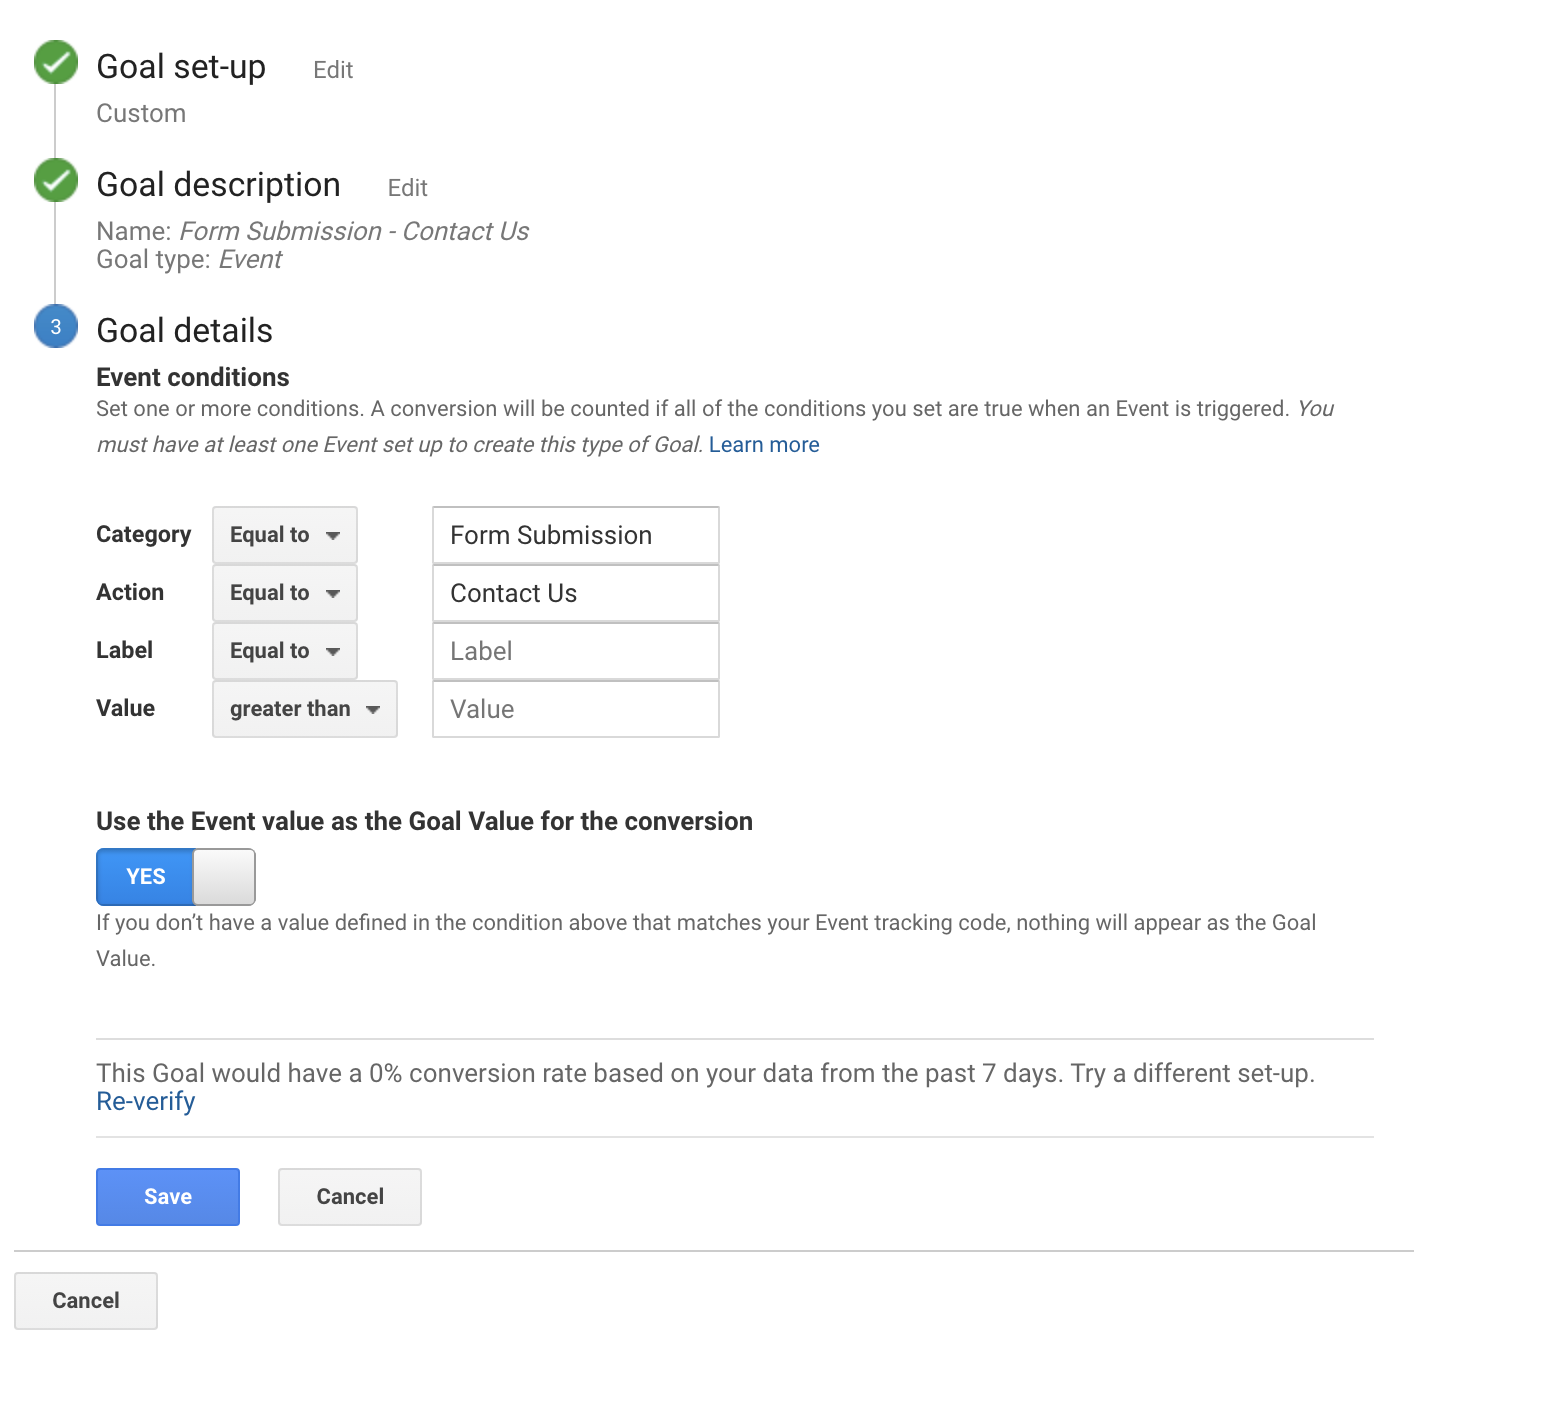 If this event/goal has happened on your site previously and you’ve put in the right details, you can then verify the goal with the link at the bottom of the page. You can then see the conversion rate of this goal on your site for the last 7 days. If this is above 0% your goal is likely working.
Now save your goal, it's done.
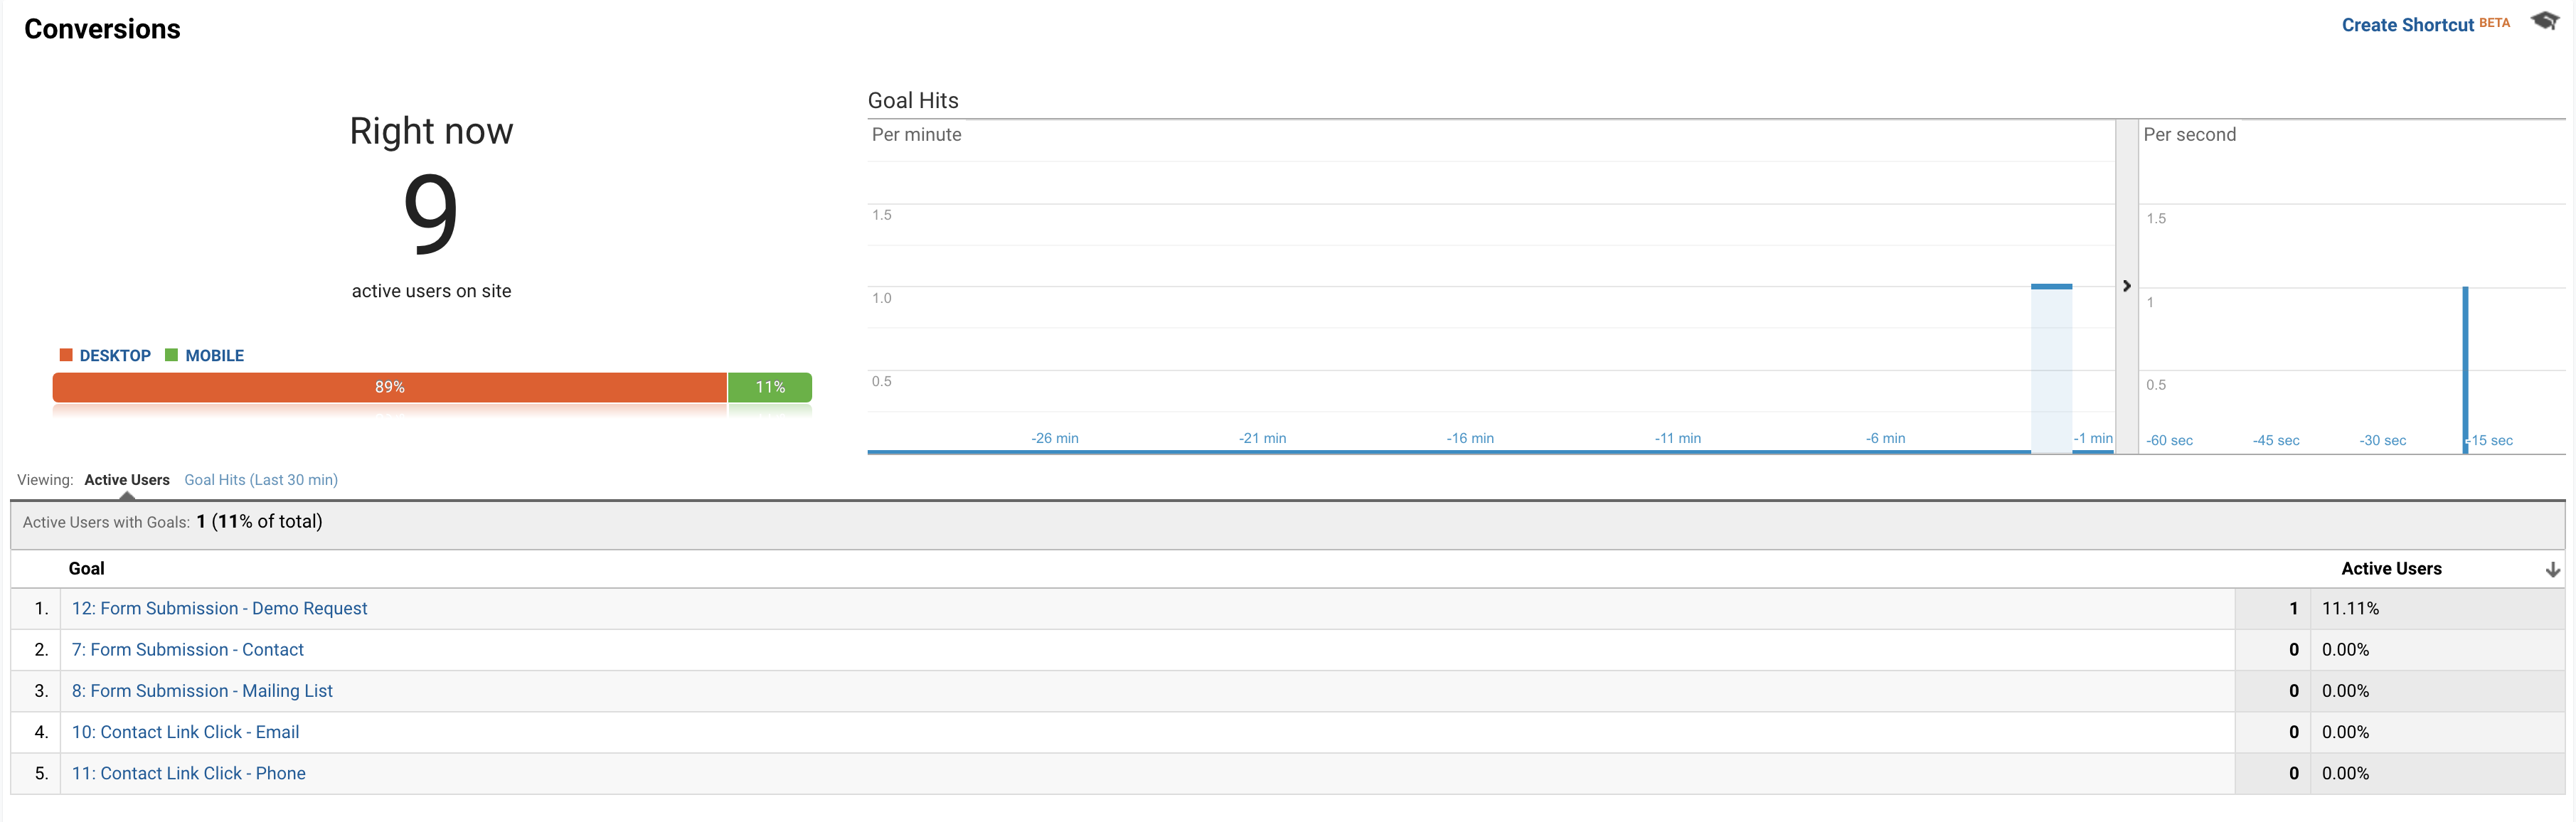
The next step is to test the goals you’ve created in the same way as your events. I know it might seem like we’ve talked about this a lot, but it really is essential! You should run through each goal one by one and check the real-time report. To see real-time goals, just use the Real-Time > conversions report. Remember Google Analytics will only track unique goal completions in a session. So, if you trigger a goal twice you might only see one conversion in GA.
Once you’re happy with this, you will have successfully implemented and tested your website tracking.
Other Resources
Getting started with GTM can seem like a daunting and overwhelming task initially. However, it’s fairly straightforward once you get the hang of the basics. Hopefully this post has helped with this, but if you’d like any more information there’s a massive community of GTM enthusiasts who are always ready to provide information and support.
Simo Ahava – this guy is a GTM legend and if you’re looking for anything GTM he’s probably written about it. Some of his posts can be quite complex but he has tips and tricks for all levels.
Bounteous (previously LunaMetrics) – this is a great website with a heap of knowledge for everyone. It also provides a large selection of plugins for GTM. Reducing the amount of time it takes to setup your account. They might take a little bit of customisation, but we’ve never experienced any issues.
People – Whether it’s on Twitter or Stack Overflow there’s a whole community of developers who work on GTM and love the platform. Be sure to do some research and follow these types of people if you want to become more proficient in GTM. They’ll often provide the latest news and updates and much more. You can also follow the Innovation Visual Twitter for regular updates on GTM as well.
Google – unsurprising Google itself is always a good place to start. They have a lot of documentation on all the basics.
We work on GTM on a daily basis and have worked on a whole range of projects, large and small. If you’d like some advice on GTM or would like to tell us about a tracking project you need help with we’d love to hear it. Feel free to get in touch with one of our experienced GTM developers here.


