When it comes to running effective Google Shopping campaigns, one of the most critical steps is the build itself. A well-thought-out structure can set you up for success from day 1 and make managing campaigns a breeze. A badly planned or unintuitive structure, on the other hand, can ‘bake in’ problems that make effective ongoing optimisation all but impossible.
A good analogy for building Google Ads campaigns is that it’s like setting up a filing system for your documents, and nowhere is this more true than for Google Shopping campaigns. There are multiple ways you can segment your campaign - by campaign, by ad group, by product type, by product category, by brand, by product margin, by seasonal promotions, etc.
Just as with any folder system, there is no one correct way to set up a Shopping campaign. However, it is important to understand that whatever setup you choose, there will be compromises. Structuring your campaign around brands, for example, is logical and allows you to focus your budget on more popular lines, but it might make running campaigns for seasonal promotions or focusing on higher margin items more difficult.
In this guide, we’ll look at a few of the ways you can structure your campaigns and explain the relative merits and pitfalls of each approach, before diving deeper into campaign priorities and how to use them.
A Word on Smart Shopping
This guide is specifically about setting up regular, manual Shopping campaigns, but there is another type: the comparatively new Smart Shopping campaign.
Smart Shopping campaigns are a different beast altogether. They use a combination of your feed and Google’s machine learning capabilities to automatically determine traffic to send to your site. They can work very well, but overall, you have a lot less insight and control.
Due to the very different nature of Smart Shopping campaigns, they require different setup requirements, which we’ll cover in a separate guide.
For now, though, we’ll focus on regular shopping campaigns and how to set them up.
The Basics
Let’s start with the essentials. Before you can make a start on actually planning your campaign structure, you’ll need to make sure your ads will be eligible to run. This means ensuring that:
- Your account isn’t suspended.
- You’ll need to have submitted all required business information and made sure to review the diagnosis page, which will highlight any account issues.
- All your products contain essential product attributes.
- Your feed needs to meet Google’s standards for your ads to be able to run.
- We cover feed optimisation practices in our article, How to Effectively Optimise Your Google Shopping campaigns.
- At a minimum, your products need to contain accurate data for all required attributes.
- Merchant and products are compliant with all Google policies.
- You need to make sure that you comply with all of Google’s shopping policies.
- This is particularly pertinent if you’re operating in a sector that Google considers ‘sensitive’ and places additional restrictions on.
- Some industries you just won’t be able to run campaigns for. You can read more about prohibitions in Google’s article here.
- All your products are live and eligible to run.
Once that’s in place, you can move on to planning your structure.
A Guide To Structure
Google Shopping campaigns can be broken down into the following levels:
> Campaign
> Ad Group
> Product Group
> Product
or
> Product Group
> Product Group
> Product
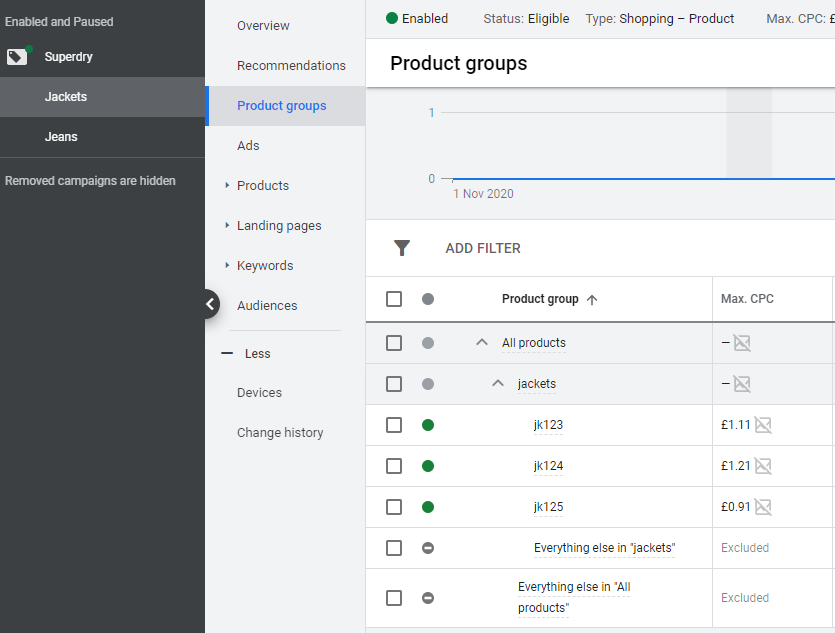
Product groups are determined by data in your product feed. You can use any of the following data feed attributes to create a product group:
- Brand
- Category (also referred to as the Google Product Category, or GPC)
- Product type
- Item ID
- Custom labels
- Condition
- Channel
- Channel exclusivity
Your data feed may not have all of these, and not all of them will be applicable to you (for example, if you only sell brand new products, then ‘Condition’ is not relevant. You will however have at least some of these (as several are required attributes), and which of these you choose will have a profound impact on your campaign structure and management options going forward.
A good rule of thumb is to use what we refer to as a relational, broad-to-narrow structure. If you look at the above, it should be fairly obvious that there are some attributes which can be further segmented more easily than others. If your product group is based on brand, then you can further segment this by product category or type, and then again by product ID or custom label. If you start with the product ID, however, you can’t split that down any further.
For this reason, it generally makes sense to start at the campaign and ad group level with one of the broader segmentation options, narrowing further as you split by product groups. There are a handful of exceptions to this, which we’ll cover later, but by and large, this is the best way to go.
As a rule of thumb, we’d also recommend that you keep it to one product group per ad group, unless this is going to result in a massive and unwieldy structure.
Structuring Options
The following are a few different ways you can split your campaigns. We’ll cover the various pros and cons of each approach, so you can determine which one will be best for you and your inventory.
By Brand
Segmenting your inventory by brand is a common and logical option. There are many variations on the theme: you could, for example, have one campaign per brand, with ad groups for the different categories:
Alternatively, you could split your campaigns based on brand popularity, with ad groups for each brand:

Pros
- Simple & easy to manage.
- Broad to narrow relational structure. Can easily be further segmented.
- Allows you to portion budget by brands.
Cons
- Lose some flexibility, particularly with seasonality. For example, you cannot apportion budget to specific ranges (e.g. coats in winter, shorts in summer).
- More difficult to split higher value from lower value items (e.g. Weber gas barbecues vs Weber bags of charcoal).
Best Suited For
- Retailers stocking a wide range of well-known brands.
By Product Type
Segmenting by product type is a good option for most retailers, but it does rely on you having a well-optimised feed. Product type campaigns can easily be further subdivided, for example, by brand or item ID.

Pros
- Simple and easy to manage.
- Broad to narrow relational structure. Can easily be further segmented.
- Allows you to portion budget by higher value items.
- Greater flexibility for seasonality.
Cons
- Lose ability to apportion budget by brand.
- Heavily reliant on the quality of your feed.
Best Suited For
- All
The most common misconception we hear about HubSpot is that it’s ‘just an email platform’. Whilst the Marketing Hub does include an intuitive drag and drop email builder, HubSpot is a full suite of enterprise-grade marketing and sales applications designed to help you scale your business. Their real power is the integration across functions though.
By Google Product Category
If you don’t have custom product types in place, you could use Google Product Categories. These are a fixed list set by Google, and are still reliant on the quality of your feed, but may be easier to use if you don’t have the time or resources to add custom product types to all your products.
Pros
- Simple and easy to manage.
- Broad to narrow relational structure. Can easily be further segmented.
- Allows you to apportion budget by higher value items.
- Greater flexibility for seasonality.
Cons
- Lose ability to apportion budget by brand.
- Still reliant on the quality of your feed.
- Less customisation and flexibility than Product Types.
Best Suited For
- All, but particularly those without the option to use Product Types.
By Custom Label
Custom labels are a way of adding additional information to your products, and can be a good way of organising your campaigns. For example, you could create a label marked ‘sale’, and then use this to split your campaigns:

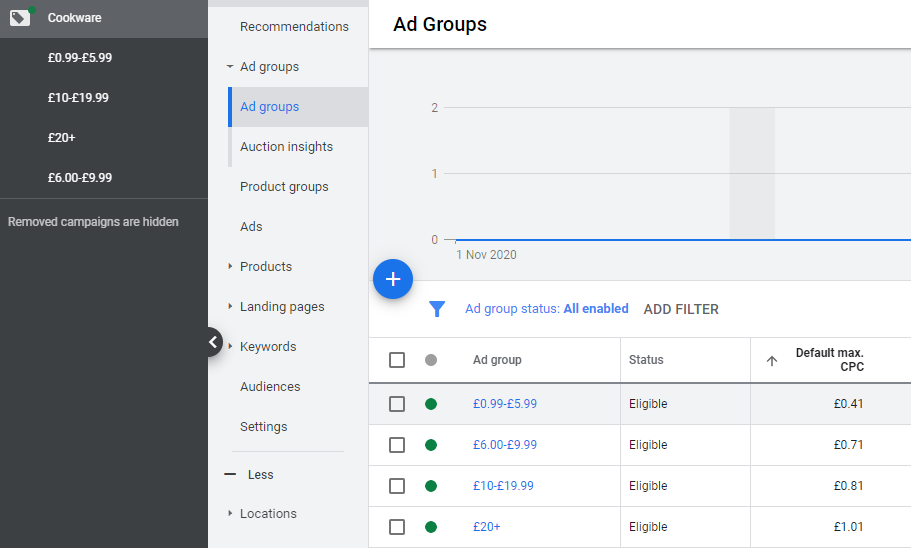
Alternatively, you could label your products by price range, allowing you to split your campaigns by product value:

Keep in mind, however, that Custom Label is at the narrower end of the relational tree, so if you segment at the campaign level, you may find you’ve backed yourself into a corner and can’t segment much further.
For this reason, it might make more sense to use your Custom Labels as inventory filters rather than directly segmenting campaigns with them.
Pros
- Offers added flexibility, particularly for short-term promotional campaigns.
- Can organise products by unique attributes.
- Allows unique capabilities like segmenting by sale items and price tiers.
Cons
- At the low end of the broad-to-narrow tree. Leaves little room for further segmentation unless the labels apply to a very wide range of products.
- Reliant on a well-optimised data feed.
- Labels may need regularly updating.
- Can be harder to manage.
Best Suited For
- Retailers running temporary promotional campaigns.
- Retailers with a wide range of product prices.
By Item ID
Segmenting by item ID at the ad group or even campaign level is about as granular as it gets. Clearly, there is nowhere to go once you’ve segmented by ID - you can’t further divide a single product!
There are a couple of edge cases for segmenting by item ID, typically if you have either a very small inventory, or one or two key products you want to devote management and budget to. In all other circumstances, however, we’d recommend using one of the other segmentation methods and saving product ID segmentation for bid level only.
Pros
- Extremely granular.
- The only way to control budget at the product level.
Cons
- At the very bottom end of the broad-to-narrow structure. Zero room for further segmentation.
- Impractical for more than a few products, as would lead to massive, unwieldy campaign structure.
Best Suited For
- Retailers with very small inventories.
- Retailers where a significant portion of revenue is generated by a very low number of products.
Channel & Channel Exclusivity
This one is specifically for retailers looking to promote local inventory in their bricks and mortar stores. If that’s you, then you’ll need to make sure you’ve set your account up for local inventory promotion before you can add this to your campaigns.
Segmenting by channel and channel exclusivity is useful if you need to separate (for example) products that can only be bought online vs products that can only be bought in store.
For example, if most of your products can be bought online, but you have a number of products that are collection only, you may wish to separate these out from the bulk of your campaigns for greater budgetary control and easier management.
Pros
- Useful if you have mixed inventory that can be sold both online or in store, or some variation on the two.
- Useful for specifically targeting customers in and around the physical location of your stores.
- May help with profitability (if for example, you can avoid the expense of shipping large items).
Cons
- Typically at the lower end of the broad-to-narrow tree. Can prevent further segmentation.
Best Suited For
- Retailers with physical stores looking to promote local inventory.
- Retailers with non-shippable, collection-only items.
By Condition
If you stock a mix of new and used products, then you might want to look at segmenting by product condition. The profit margins for new vs used items are likely to be different, so it makes sense to segment them out.
This could be done at the campaign level, but would be very restrictive, leaving you with only two campaigns - one for ‘Used’, and one for ‘New’. For this reason, we’d generally recommend segmenting by one of the other campaign options listed above, and then filtering by condition.
Best Suited For
- Retailers with a mixed inventory.
Campaign Priority
Campaign priorities can be set to High, Medium, or Low, and determine which campaign Google looks at first when deciding which ad to serve to a user.
A few rules: if a product is eligible to show in multiple campaigns, Google will attempt to serve it from the higher priority campaign first. If the budget on a higher priority campaign runs out, the next highest priority campaign will bid. If eligible campaigns have the same priority, the one with the highest bid will be used.
The most basic way to use priorities is to set your most important campaigns (such as sale campaigns or high value product campaigns) as high. For most people, using ‘Medium’ by default, with ‘High’ for your most important campaigns and ‘Low’ for your catch all campaigns (see below) should be sufficient.
However, there is another, more advanced way you can use campaign priorities.
Consider the following search terms:
- trainers
- nike trainers
- nike adapt bb trainers
Which of these is the more intent-based search term? The answer, of course, is the third one. Three very different search terms, all potentially eligible to show from a single campaign.
The problem with Shopping campaigns is that, because they are feed driven rather than keyword driven, a Nike trainer retailer will be bidding exactly the same for each of the three terms, when really they want to be bidding less for the more generic search and more for the specific search.
The way to resolve this is with campaign priorities. By combining campaign priorities with negative keywords, it is possible (though not easy) to segment out search terms by value.
Example:
- Campaign 1
- Selling: Nike trainers
- Priority: High
- Negative keywords: “nike”, “adapt”, “bb”
- Bid: £0.20
- Campaign 2:
- Selling: Nike trainers
- Priority: Medium
- Negative keywords: “adapt”, “bb”
- Bid: £0.75
- Campaign 3:
- Selling: Nike trainers
- Priority: Low
- Negative keywords: -
- Bid: £1.01
With the above example, the three search terms would be correctly filtered to the correct campaigns.
- Scenario 1:
- User searches for ‘trainers’ > Google checks highest priority campaign > Search term not blocked by negative keywords > Ad serves.
- Bid: £0.20
- Scenario 2:
- User searches for ‘nike trainers’ > Google checks highest priority campaign > Search term blocked by negative keywords > Google checks next highest priority campaign > Search term not blocked by negative keywords > Ad serves.
- Bid: £0.75
- Scenario 3:
- User searches for ‘nike adapt bb trainers’ > Google checks highest priority campaign > Search term blocked by negative keywords > Google checks next highest priority campaign > Search term blocked by negative keywords > Google checks next highest priority campaign > Search term not blocked by negative keywords > Ad serves.
- Bid: £1.01
WARNING: Implementing campaigns like this is not for beginners, and if done incorrectly, can easily mess up the rest of your campaign performance. Only do this if you are familiar with the requirements of and have time for regular and active campaign management. Alternatively, work with a Google Ads specialist who can plan out this type of campaign for you. If you would like to talk to someone about how we could help optimise your Google Shopping, please do get in touch.
Catch All Campaigns
Every time you add a level of segmentation to a campaign, you are effectively filtering potential searches out. A good campaign structure should cover all of the inventory that you want to advertise, but even with the best structure, there’s the possibility that a few products may inadvertently be excluded entirely.
For that reason, Google recommends you have a catch-all campaign to act as a kind of ‘drip tray’ (our words, not theirs), that will ensure you catch relevant search terms that might otherwise have slipped through the net. For this, we’d recommend setting it to low priority and low bids, keeping an eye on search terms to spot any trends that suggest your campaign structure is consistently excluding valuable traffic.
Summary & Key Points
A considered, suitable campaign structure is absolutely critical to Google Shopping success. Get it right and you will have a solid platform for developing a profitable revenue stream. Get it wrong and you could waste a lot of money, or fail to get your ads off the ground at all, and make the job of optimising the campaigns a lot harder.
Our key takeaways would be:
- Plan!
- Don’t rush into your build.
- Take time to consider the possible options and pick the structure that’s the best fit for your business and inventory.
- Remember: broad-to-narrow.
- Think about your segmentation. Don’t tie yourself down with a structure that makes further segmentation impossible.
- If in doubt, keep it simple.
- Resist the temptation to be too clever for your own good.
- A complex multi-priority setup might sound attractive, but it can be hard to get them to work.
- A good setup should be easy to explain. If you’re tying yourself in knots with the planning, it’s a sign that you need to step back and start with something more straightforward.
- Adapt.
- Be prepared to adjust your setup as the data comes in.
- A good structure should allow you to do this without having to completely redo everything (see point 3 again!)
- We’ll cover this in more detail in our guide to Shopping campaign optimisation.
Google Shopping Experts
Hopefully, you’ve found this guide useful and you’ve gained a better understanding of some of the more advanced and technical aspects of Google Shopping campaigns. However, if you would like more support in the strategy, creation and optimisation of your shopping campaigns, feel free to get in touch with our friendly PPC experts.